Spring Interview Questions and Answers Q1 - Q14 are FAQs
If you have a GUI application (i.e. a war) and a separate
RESTful service application as a separate application running on two different domains, the you need
JSONP for your Ajax to make cross domain calls. In this demo, I will be building a single war and deploy it to two different domains. For example, local and dev. The initial "
sum" page will be loaded from the "
local" domain, and once you click on the "
add" button, the Ajax call will be made to the "
dev" domain to get the calculated sum via the RESTful web service call via
jsonp callback.
Here are the steps involved in setting up the relevant artifacts.
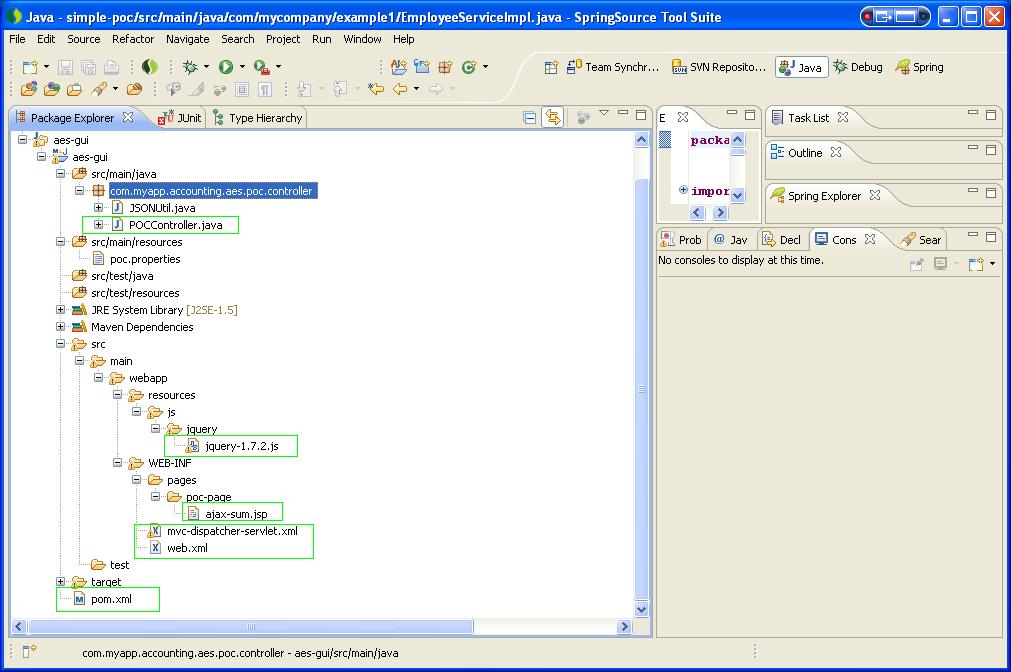
Step 1: Create a new maven war project. This was explained in earlier tutorials.You could also create it within eclipse via
File -->
New -->
Other -->
Maven -->
Maven Project. Skip the archetype selection by ticking the "
create a simple project" check box. Fill in the "groupid" and "artifact id" details.The packaging is a "
war".
Step 2: Wire up the relevant maven dependencies via the pom.xml.
<project xmlns="http://maven.apache.org/POM/4.0.0" xmlns:xsi="http://www.w3.org/2001/XMLSchema-instance"
 xsi:schemaLocation="http://maven.apache.org/POM/4.0.0 http://maven.apache.org/xsd/maven-4.0.0.xsd">
 <modelVersion>4.0.0</modelVersion>
 <groupId>com.myapp.acoounting</groupId>
 <artifactId>aes-gui</artifactId>
 <version>0.0.1-SNAPSHOT</version>
 <packaging>war</packaging>
 <name>aes frontend</name>
 <description>GUI to expose aes services</description>

 <properties>
  <spring.version>3.1.0.RELEASE</spring.version>
  <servlet.jstl.version>1.2</servlet.jstl.version>
  <taglibs.standard.version>1.1.2</taglibs.standard.version>
  <servlet.api>2.5</servlet.api>
  <jackson-mapper-asl.version>1.9.8</jackson-mapper-asl.version>
 </properties>

 <dependencies>

  <!-- Spring -->
  <dependency>
   <groupId>org.springframework</groupId>
   <artifactId>spring-core</artifactId>
   <version>${spring.version}</version>
  </dependency>

  <dependency>
   <groupId>org.springframework</groupId>
   <artifactId>spring-context</artifactId>
   <version>${spring.version}</version>
  </dependency>

  <dependency>
   <groupId>org.springframework</groupId>
   <artifactId>spring-beans</artifactId>
   <version>${spring.version}</version>
  </dependency>


  <!-- Spring MVC framework -->
  <dependency>
   <groupId>org.springframework</groupId>
   <artifactId>spring-webmvc</artifactId>
   <version>${spring.version}</version>
  </dependency>

  <!-- existence of Jackson and JAXB 2 on the classpath will automatically
   create and register default JSON and XML converters -->
  <dependency>
   <groupId>org.codehaus.jackson</groupId>
   <artifactId>jackson-mapper-asl</artifactId>
   <version>${jackson-mapper-asl.version}</version>
   <scope>runtime</scope>
  </dependency>

  <!-- JSTL -->
  <dependency>
   <groupId>javax.servlet</groupId>
   <artifactId>jstl</artifactId>
   <version>${servlet.jstl.version}</version>
  </dependency>

  <dependency>
   <groupId>taglibs</groupId>
   <artifactId>standard</artifactId>
   <version>${taglibs.standard.version}</version>
  </dependency>

  <!-- for compile only, your container should have this -->
  <dependency>
   <groupId>javax.servlet</groupId>
   <artifactId>servlet-api</artifactId>
   <version>${servlet.api}</version>
   <scope>provided</scope>
  </dependency>

 </dependencies>
</project>
Step 3: Define the Spring MC controller class that will be used for both returning the initial "sum" web page as shown above and also exposes the
RESTful web service call to calculate the sum.
package com.myapp.acoounting.aes.poc.controller;

import org.springframework.http.HttpHeaders;
import org.springframework.http.HttpStatus;
import org.springframework.http.ResponseEntity;
import org.springframework.stereotype.Controller;
import org.springframework.ui.Model;
import org.springframework.web.bind.annotation.RequestMapping;
import org.springframework.web.bind.annotation.RequestMethod;
import org.springframework.web.bind.annotation.RequestParam;

@Controller
@RequestMapping("/poc/main")
public class POCController {

    //serves the initial page
 @RequestMapping(value = "/sum", method = RequestMethod.GET)
 public String getNonAjaxPage() {
  return "poc-page/ajax-sum"; // returns the poc-page/ajax-sum.jsp
 }


 //serves the RESTful web service
 @RequestMapping(value = "/add", method = RequestMethod.GET)
 public ResponseEntity<String> add(
   @RequestParam(value = "inputNumber1", required = true) Integer inputNumber1,
   @RequestParam(value = "inputNumber2", required = true) Integer inputNumber2,
   @RequestParam(value = "callback", required = false) String callback,
   Model model) {

  //do the actual adding
  Integer sum = inputNumber1 + inputNumber2;

  String result = null;

  // @ResponseBody will automatically convert the returned value into JSON
  // format. You must have Jackson in your classpath

  if (callback != null && callback.trim().length() > 0) {
   result = callback + "(" + sum + ")";
  }

  HttpHeaders responseHeaders = new HttpHeaders();

  return new ResponseEntity<String>(result, responseHeaders, HttpStatus.OK);
 }
}
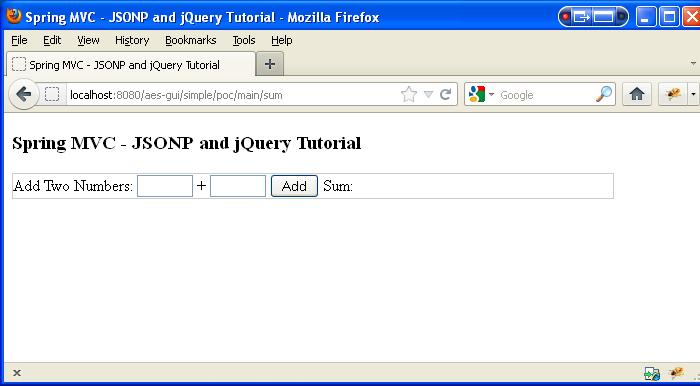
Step 4: The
ajax-sum.jsp that gets returned when the following URL is typed on a browser.
http://localhost:8080/aes-gui/simple/poc/main/sum
You could notice here that the jQuery.js is loaded from the
localhost domain and the Ajax call is made to the
DEV domain.
<%@ taglib uri="http://java.sun.com/jsp/jstl/core" prefix="c" %>
<%@ page language="java" contentType="text/html; charset=UTF-8"
    pageEncoding="UTF-8"%>
<!DOCTYPE html PUBLIC "-//W3C//DTD HTML 4.01 Transitional//EN" "http://www.w3.org/TR/html4/loose.dtd">
<html>
<head>
 <meta http-equiv="Content-Type" content="text/html; charset=UTF-8">

  <meta http-equiv="Content-Type" content="text/html; charset=UTF-8">

 <!-- This page and jQuery JS are downloaded via localhost domain-->
 <script type="text/javascript" src="/aes-gui/resources/js/jquery/jquery-1.7.2.js"></script>

 <title>Spring MVC - JSONP and jQuery Tutorial</title>
</head>
<body>

<h3>Spring MVC - JSONP and jQuery Tutorial</h3>

<div style="border: 1px solid #ccc; width: 600px;">
 Add Two Numbers:

 <input id="inputNumber1" name="inputNumber1" type="text" size="5" > +
 <input id="inputNumber2" name="inputNumber2" type="text" size="5">
 <input type="submit" value="Add" onclick="add()" />

 Sum: <span id="sum"></span>
</div>


<script type="text/javascript">

 function add() {
  var url = 'http://DEV:8080/aes-gui/simple/poc/main/add?callback=?';

  console.log("logging...............");

  $.ajax({
   type : 'GET',
   url : url,
   data : {
    inputNumber1 : $("#inputNumber1").val(),
    inputNumber2 : $("#inputNumber2").val()
   },
   async : false,
   //contentType : "application/json",
   dataType : 'jsonp',
   //jsonp:  "callback",
   //jsonpCallback: processJSON(jsonData),
   success : function(response, textStatus, jqXHR) {
    console.log("reached here");
    // data contains the result
    // Assign result to the sum id
    $("#sum").replaceWith('<span id="sum">' + response + '</span>');
    console.log(response);

   },
   error : function(jqXHR, textStatus, errorThrown) {
    console.log(errorThrown);
   }
  });
 };

</script>


</body>
</html>
Make sure that you have downloaded the jquery-x.x.x.js library file and saved it under
resources/js/jQuery/ folder.
Step 5: The next step is to wire up everything via web.xml and spring application context files.
Firstly, the
web.xml file. This will be under the
WEB-INF folder.
<?xml version="1.0" encoding="UTF-8"?>

<web-app version="2.5" xmlns="http://java.sun.com/xml/ns/javaee"
 xmlns:xsi="http://www.w3.org/2001/XMLSchema-instance"
 xsi:schemaLocation="http://java.sun.com/xml/ns/javaee http://java.sun.com/xml/ns/javaee/web-app_2_5.xsd">

 <!-- Processes application requests for Securities component related requests -->
 <servlet>
  <servlet-name>mvc-dispatcher</servlet-name>
  <servlet-class>org.springframework.web.servlet.DispatcherServlet</servlet-class>
  <load-on-startup>1</load-on-startup>
 </servlet>

 <servlet-mapping>
  <servlet-name>mvc-dispatcher</servlet-name>
  <url-pattern>/simple/*</url-pattern>
 </servlet-mapping>

 <context-param>
  <param-name>contextConfigLocation</param-name>
  <param-value>/WEB-INF/mvc-dispatcher-servlet.xml</param-value>
 </context-param>

 <!-- Creates the Spring Container shared by all Servlets and Filters -->
 <listener>
  <listener-class>org.springframework.web.context.ContextLoaderListener</listener-class>
 </listener>

</web-app>
Secondly, the
Spring application context file.
<beans xmlns="http://www.springframework.org/schema/beans"
    xmlns:xsi="http://www.w3.org/2001/XMLSchema-instance"
    xmlns:mvc="http://www.springframework.org/schema/mvc"
    xmlns:context="http://www.springframework.org/schema/context"
    xsi:schemaLocation="
            http://www.springframework.org/schema/beans http://www.springframework.org/schema/beans/spring-beans-3.1.xsd
            http://www.springframework.org/schema/mvc http://www.springframework.org/schema/mvc/spring-mvc-3.1.xsd
            http://www.springframework.org/schema/context http://www.springframework.org/schema/context/spring-context-3.1.xsd">


    <context:annotation-config />
 <context:component-scan base-package="com.myapp.accounting.aes" />

 <mvc:annotation-driven />

 <bean
  class="org.springframework.web.servlet.view.InternalResourceViewResolver">
  <property name="prefix">
   <value>/WEB-INF/pages/</value>
  </property>
  <property name="suffix">
   <value>.jsp</value>
  </property>
 </bean>

</beans>
That's all to it.
Labels: jQuery, JSONP