Google

May 8, 2014

RESTEasy tutorial with Spring, Maven, and Eclipse

This assumes that you have gone through the RESTEasy tutorial to create RESTFul web services with Maven and Eclipse.


Step 1: In this tutorial, we are going to use RESTeasy with Spring. So, the pom.xml file needs to have Spring jar dependencies.

<project xmlns="http://maven.apache.org/POM/4.0.0" xmlns:xsi="http://www.w3.org/2001/XMLSchema-instance"
 xsi:schemaLocation="http://maven.apache.org/POM/4.0.0 http://maven.apache.org/maven-v4_0_0.xsd">
 <modelVersion>4.0.0</modelVersion>
 <groupId>com.mycompany</groupId>
 <artifactId>RESTfulWebService</artifactId>
 <packaging>war</packaging>
 <version>1.0-SNAPSHOT</version>
 <name>RESTfulWebService Maven Webapp</name>
 <url>http://maven.apache.org</url>

 <build>
  <finalName>RESTfulWebService</finalName>
 </build>

 <properties>
  <resteasy.version>2.3.6.Final</resteasy.version>
  <spring.version>3.1.0.RELEASE</spring.version>
 </properties>

 <dependencies>
  <dependency>
   <groupId>junit</groupId>
   <artifactId>junit</artifactId>
   <version>3.8.1</version>
   <scope>test</scope>
  </dependency>


  <!-- JAX-RS dependencies -->
  <dependency>
   <groupId>org.jboss.resteasy</groupId>
   <artifactId>jaxrs-api</artifactId>
   <version>${resteasy.version}</version>
  </dependency>
  <dependency>
   <groupId>org.jboss.resteasy</groupId>
   <artifactId>resteasy-jaxrs</artifactId>
   <version>${resteasy.version}</version>
  </dependency>
  <dependency>
   <groupId>org.jboss.resteasy</groupId>
   <artifactId>resteasy-jaxb-provider</artifactId>
   <version>${resteasy.version}</version>
  </dependency>

  <!-- JAX-RS -->
  <dependency>
   <groupId>org.jboss.resteasy</groupId>
   <artifactId>resteasy-spring</artifactId>
   <scope>runtime</scope>
   <version>${resteasy.version}</version>
  </dependency>


  <!-- Spring Dependencies -->
  <dependency>
   <groupId>org.springframework</groupId>
   <artifactId>spring-core</artifactId>
   <scope>compile</scope>
   <version>${spring.version}</version>
  </dependency>
  <dependency>
   <groupId>org.springframework</groupId>
   <artifactId>spring-beans</artifactId>
   <scope>compile</scope>
   <version>${spring.version}</version>
  </dependency>
  <dependency>
   <groupId>org.springframework</groupId>
   <artifactId>spring-context</artifactId>
   <scope>compile</scope>
   <version>${spring.version}</version>
  </dependency>
  <dependency>
   <groupId>org.springframework</groupId>
   <artifactId>spring-context-support</artifactId>
   <scope>runtime</scope>
   <version>${spring.version}</version>
  </dependency>
  <dependency>
   <groupId>org.springframework</groupId>
   <artifactId>spring-expression</artifactId>
   <scope>runtime</scope>
   <version>${spring.version}</version>
  </dependency>
  <dependency>
   <groupId>org.springframework</groupId>
   <artifactId>spring-aop</artifactId>
   <scope>runtime</scope>
   <version>${spring.version}</version>
  </dependency>
  <dependency>
   <groupId>org.springframework</groupId>
   <artifactId>spring-web</artifactId>
   <scope>compile</scope>
   <version>${spring.version}</version>
  </dependency>
  <dependency>
   <groupId>org.springframework</groupId>
   <artifactId>spring-test</artifactId>
   <scope>test</scope>
   <version>${spring.version}</version>
  </dependency>

 </dependencies>

</project>


Note: resteasy-spring and other org.springframework libraries.


Step 2: The files that are getting modified or added are highlighted in green.


Step 3: Add the Java interfaces and the classes as shown below.

Firstly, the Web Service interface that talks HTTP protocol. This interface has the web service annotations

package com.mycompany;

import javax.ws.rs.GET;
import javax.ws.rs.Path;
import javax.ws.rs.PathParam;
import javax.ws.rs.core.Response;

@Path("/simple")
public interface SimpleWebService {

 @GET
 @Path("/{param}")
 public abstract Response printMessage(@PathParam("param") String msg);
}


Secondly, the web service implementation, that makes use of plan POJO class for the business logic, and this plain service (i.e. protocol agnostic) class will be dependency injected via Spring file applicationContext.xml under src/main/resources/com/mycompany.

package com.mycompany;

import javax.ws.rs.core.Response;

public class SimpleWebServiceImpl implements SimpleWebService {

 private SimpleService service;
 
 public SimpleWebServiceImpl(){}
 
 public SimpleWebServiceImpl(SimpleService service) {
  this.service = service;
 }

 public Response printMessage(String msg) {
  String result = service.getMessage(msg);
  return Response.status(200).entity(result).build();
 }

}


Define the SimpleService  POJO interface  (i.e. PROTOCOL agnostic) that is injected in to the Web Service.

package com.mycompany;

public interface SimpleService {
 
 public abstract String getMessage( String msg);
}


The corresponsing implementation class that has the business logic. In this case just prepends "Hello : " to the msg.

package com.mycompany;

public class SimpleServiceImpl implements SimpleService{

 public String getMessage( String msg) {
  String result = "Hello : " + msg;
  return result;
 }
}


Step 4: Wire up the above Java artifacts via Spring, by creating the applicationContext.xml file under  src/main/resources/com/mycompany.

<beans xmlns="http://www.springframework.org/schema/beans"
 xmlns:xsi="http://www.w3.org/2001/XMLSchema-instance"
 xsi:schemaLocation="http://www.springframework.org/schema/beans 
 http://www.springframework.org/schema/beans/spring-beans-3.0.xsd">


 <bean id="simpleWebService" class="com.mycompany.SimpleWebServiceImpl">
  <constructor-arg ref="simpleService" />
 </bean>


 <bean id="simpleService" class="com.mycompany.SimpleServiceImpl" />

</beans>


Step 5: Bootstrap the Spring applicationContext.xml file and the RESTEasy config via the web.xml file.

<!DOCTYPE web-app PUBLIC
 "-//Sun Microsystems, Inc.//DTD Web Application 2.3//EN"
 "http://java.sun.com/dtd/web-app_2_3.dtd" >

<web-app>
 <display-name>Archetype Created Web Application</display-name>

 <!-- this need same with resteasy servlet url-pattern -->
 <context-param>
  <param-name>resteasy.servlet.mapping.prefix</param-name>
  <param-value>/rest</param-value>
 </context-param>

 <context-param>
  <param-name>contextConfigLocation</param-name>
  <param-value>classpath:/com/mycompany/applicationContext.xml</param-value>
 </context-param>

 <listener>
  <listener-class>
   org.jboss.resteasy.plugins.server.servlet.ResteasyBootstrap
  </listener-class>
 </listener>
 <listener>
  <listener-class>org.jboss.resteasy.plugins.spring.SpringContextLoaderListener</listener-class>
 </listener>

 <servlet>
  <servlet-name>resteasy-servlet</servlet-name>
  <servlet-class>
   org.jboss.resteasy.plugins.server.servlet.HttpServletDispatcher
  </servlet-class>
 </servlet>

 <servlet-mapping>
  <servlet-name>resteasy-servlet</servlet-name>
  <url-pattern>/rest/*</url-pattern>
 </servlet-mapping>

</web-app>


Note: resteasy.scan context param has been removed, and  contextConfigLocation has been added to  define the the Spring applicationContext.xml file. A new listener defining "SpringContextLoaderListener" has been added to bootstrap spring in a web application.


Step 6: Build the application using "mvn package" command as previous tutorial, and access the app using the URL  http://localhost:8080/RESTfulWebService/rest/simple/Arul.


Labels: , ,

May 7, 2014

RESTEasy tutorial to create RESTFul web services with Maven and Eclipse

Assumes that you have set up Java and Maven.

Step 1: Generate a maven Web project.

mvn archetype:generate -DgroupId=com.mycompany -DartifactId=RESTfulWebService
 -DarchetypeArtifactId=maven-archetype-webapp -DinteractiveMode=false


If you set -DinteractiveMode=true, you will be prompted for some inputs.

From the folder where you ran this, you should now have the following file structure created.


Step 2: Open eclipse and import this project in with File --> Import --> Existing Maven Projects, and on the pop-up select the folder RESTfulWebService you created earlier containing the pom.xml file.

Step 3: Open the pom.xml file and add the RESTEasy library dependencies.

<project xmlns="http://maven.apache.org/POM/4.0.0" xmlns:xsi="http://www.w3.org/2001/XMLSchema-instance"
 xsi:schemaLocation="http://maven.apache.org/POM/4.0.0 http://maven.apache.org/maven-v4_0_0.xsd">
 <modelVersion>4.0.0</modelVersion>
 <groupId>com.mycompany</groupId>
 <artifactId>RESTfulWebService</artifactId>
 <packaging>war</packaging>
 <version>1.0-SNAPSHOT</version>
 <name>RESTfulWebService Maven Webapp</name>
 <url>http://maven.apache.org</url>
 
 <properties>
      <resteasy.version>2.3.6.Final</resteasy.version>
 </properties>
 
 <dependencies>
  <dependency>
   <groupId>junit</groupId>
   <artifactId>junit</artifactId>
   <version>3.8.1</version>
   <scope>test</scope>
  </dependency>


        <!--  JAX-RS dependencies -->

  <dependency>
   <groupId>org.jboss.resteasy</groupId>
   <artifactId>jaxrs-api</artifactId>
   <version>${resteasy.version}</version>
  </dependency>
  <dependency>
   <groupId>org.jboss.resteasy</groupId>
   <artifactId>resteasy-jaxrs</artifactId>
   <version>${resteasy.version}</version>
  </dependency>
  <dependency>
   <groupId>org.jboss.resteasy</groupId>
   <artifactId>resteasy-jaxb-provider</artifactId>
   <version>${resteasy.version}</version>
  </dependency>

 </dependencies>
 <build>
  <finalName>RESTfulWebService</finalName>
 </build>

</project>


Step 4: Run the mvn eclipse command to bring in the jar files

C:\Users\akumaras\workspace\RESTfulWebService>mvn eclipse:eclipse

Now, if you go back to eclipse and refresh the project, you will see all the dependency libraries (i.e. jars) added to your build path.


Step 5: Within eclipse create a new source folder src/main/java by right-clicking on the project RESTfulWebService and then selecting Build Path --> New Source Folder ... on the pop up context menu. The folder name is src/main/java.


Step 6: Within src/main/folder right click and create New --> Package. The package name is com.mycompany.

Step 7: Right click on com.mycompany, and  New --> Class.

package com.mycompany;

import javax.ws.rs.GET;
import javax.ws.rs.Path;
import javax.ws.rs.PathParam;
import javax.ws.rs.core.Response;


@Path("/simple")
public class SimpleService {
 
 @GET
 @Path("/{param}")
 public Response printMessage(@PathParam("param") String msg) {
 
  String result = "Hello : " + msg;
  return Response.status(200).entity(result).build();
 }
}


Step 8: Define the web.xml file. The web deployment descriptor.

<!DOCTYPE web-app PUBLIC
 "-//Sun Microsystems, Inc.//DTD Web Application 2.3//EN"
 "http://java.sun.com/dtd/web-app_2_3.dtd" >

<web-app>
 <display-name>Archetype Created Web Application</display-name>

 <!-- Auto scan REST service -->
 <context-param>
  <param-name>resteasy.scan</param-name>
  <param-value>true</param-value>
 </context-param>

 <!-- this need same with resteasy servlet url-pattern -->
 <context-param>
  <param-name>resteasy.servlet.mapping.prefix</param-name>
  <param-value>/rest</param-value>
 </context-param>

 <listener>
  <listener-class>
   org.jboss.resteasy.plugins.server.servlet.ResteasyBootstrap
  </listener-class>
 </listener>

 <servlet>
  <servlet-name>resteasy-servlet</servlet-name>
  <servlet-class>
   org.jboss.resteasy.plugins.server.servlet.HttpServletDispatcher
  </servlet-class>
 </servlet>

 <servlet-mapping>
  <servlet-name>resteasy-servlet</servlet-name>
  <url-pattern>/rest/*</url-pattern>
 </servlet-mapping>

</web-app>


Step 9: Package it as a war file using the maven command.

C:\Users\akumaras\workspace\RESTfulWebService>mvn  package


The packaged war file RESTfulWebService.war will look like


Step 10: Deploy the RESTfulWebService.war to an application server, I deployed mine to a JBoss server.

The URL to to try on a web browser is

http://localhost:8080/RESTfulWebService/rest/simple/Arul


where RESTfulWebService is the name of the war file "rest" is configured in the web.xml file as the servlet mapping "/rest/*". "simple" is the path annotation on the SimpleService class @Path("/simple"), and finally, "Arul" is the "{param}" in @Path("/{param}")


Labels: , ,

Apr 2, 2014

Java Web Service Pre Interview written test Questions and Answers

Q1. A web service protocol stack from bottom to top consists of

a) HTTP, SOAP, description language, UDDI
b) SMTP, XML messaging, WSDL, Service discovery
c) HTTP, XML messaging, WSDL, UDDI
d) HTTP, XML-RPC, WSDL, UDDI
e) HTTP, WSDL, SOAP, UDDI


A1. The answer is a,b,c, and d. The e is not right beacuse of the order.

This is an evolving standard, but the basic Web service protocol stack is (aka web service components)comprised of
  • Service transport is the lowest layer in the stack, and is responsible for transporting messages between applications. Currently, this layer includes hypertext transfer protocol (HTTP), Simple Mail Transfer Protocol (SMTP), file transfer protocol (FTP), and newer protocols, such as Blocks Extensible Exchange Protocol (BEEP).
  • XML messaging layer is responsible for encoding messages in a common XML format so that messages can be understood at either end. Currently, this layer includes XML-RPC and SOAP.
  • Service description layer responsible for describing the public interface to a specific web service. Currently, service description is handled via the Web Service Description Language (WSDL or WADL[for RESTful]).
  • Service discovery layer is responsible for centralizing services into a common registry, and providing easy publish/find functionality. Currently, service discovery is handled via Universal Description, Discovery, and Integration (UDDI).

Q2. What are the key roles played in a Web service

a) Service provider, Service requestor, Service registry
b) producer, consumer, Service registry
c) producer, consumer
d) publish, bind, find

A2. The answer is a,b,c, and d.

Q3. Which of the following are in the WSDL document structure?

a) types, message, port type, binding
b) input, output, binding, exception
c) types, input, output, exception
d) input, output, operations, binding

A3. The anser is a.

types: The data types used by the web service.

message: The input and output messages used by the web service.

port type: The operations performed by the web service. This is analogous to a class in Java programming. This also defines the input/output via messages. This is the most important part of the wsdl.

binding: The communication protocol used by the web service.


Q4. What are the different types of operations available in a WSDL?

a) One-way
b) Request-Response
c) Solicit-Response
d) Notification or fire and forget

A4. The anser is a, b, c, and d. Supports all 4 types of operations.

One-way: The operation (or endpoint) recieves a message, but will not return a response.
Request-Response: The most common one. The operation (or endpoint) recieves a request message and responds with a response message.
Solicit-Response: The operation (or endpoint) sends a request message and recieves a correlated response message.
Notification or fire and forget: The operation (or endpoint) sends a request message, but will not wait for a response.


Q. What is the difference between Request-Response and Solicit-Response?
A. Solicit-Response is a push operation like Notification, but waits for a response. Request-Response is a pull operation.

The only way to tell the difference between a request-response operation and a solicit-response operation is the ordering of the input and output elements. In request-response, the input child element comes first. In solicit-response, the output child element comes first.


Q5. Which of the following are true?

a) SOAP is a protocol and REST is a concept without any defined spec at all
b) SOAP is a XML-based message protocol, while REST is an architectural style
c) You can send SOAP envelopes in a REST application.
d) The REST verbs are "get", "put", "post" and "delete" and the nouns are identified by URLs.
e) SOAP allows many different verbs to be applied to many different nouns.

A5: The answer is a,b,c,d, and e. All are true.

a, b, and c are true because they state the fact that SOAP is an XML based message protocol and REST is a concept or architectural style.

d is true because RESTful url define the noun via the urls like

http://localhost:8080/accounting-services/1.0/forecasting/account/123/transaction/567
http://localhost:8080/accounting-services/1.0/forecasting/account/123/transactions/search?txn-date=20120201
http://localhost:8080/accounting-services/1.0/forecasting/account/123/transaction

e is true because you use different functions in SOAP port-type definition

Q6. Though both RESTful web series and SOAP web service can operate cross platform, they are architecturally different to each other. Which of the following statements are correct?

a) REST is more simple and easy to use than SOAP, hence currently more popular.
b) REST uses HTTP protocol for producing or consuming web services while SOAP uses XML.
c) REST is lightweight as compared to SOAP and preferred choice in mobile devices and PDA's.
d) REST supports different format like text, JSON and XML while SOAP only support XML.
e) REST web services call can be cached to improve performance.
f) SOAP provides more comprehensive security and transaction management.

A6: all are correct. SOAP Vs RESTful web service comparison


Q7. Which of the following statements are correct?

a) JAX-WS is an API for SOAP based web service.
b) JAX-RS is an API for RESTFul web service.
c) SOAP invokes services by calling RPC method, REST just simply calls services via URL path.
d) Apache CXF framework only supports JAX-WS
e) Jersey and RESTEasy are reference implementations of JAX-RS.

A7. a, b, c, and e are correct. d is incorrect because Apache CXF supports both JAX-WS and JAX-RS.


You may also like:  Java Web Services Interview Questions and Answers

Labels: ,

Apr 1, 2014

RESTEasy web service tutorial basic

Step 1: Create a maven project structure with the following archetype maven command. This assumes that Java and Maven are set up as per the previous tutorials.


mvn archetype:generate -DgroupId=com.mytutorial -DartifactId=simpleRestWeb -DarchetypeArtifactId=maven-archetype-webapp

Step 2: The above command creates a basic Java web structure.


Step 3: Import this into eclipse IDE. File --> Import


Step 4: Click "Next" and browse the folder simpleRestWeb you just created via mvn archetype plugin.


Step 5: Create the "java" source folder by right mouse clicking on simpleRestWeb folder, and then "Build Path" --> "New Souse Folder". type "src/main/java" as the folder name.

Step 6: Update the pom.xml file with the RESEasy library dependencies.


<project xmlns="http://maven.apache.org/POM/4.0.0" xmlns:xsi="http://www.w3.org/2001/XMLSchema-instance"
 xsi:schemaLocation="http://maven.apache.org/POM/4.0.0 http://maven.apache.org/maven-v4_0_0.xsd">
 <modelVersion>4.0.0</modelVersion>
 <groupId>com.mytutorial</groupId>
 <artifactId>simpleRestWeb</artifactId>
 <packaging>war</packaging>
 <version>1.0-SNAPSHOT</version>
 <name>simpleRestWeb Maven Webapp</name>
 <url>http://maven.apache.org</url>
 
 <properties>
  <resteasy.version>2.3.6.Final</resteasy.version>
 </properties>
 
 <dependencies>
  <dependency>
   <groupId>junit</groupId>
   <artifactId>junit</artifactId>
   <version>3.8.1</version>
   <scope>test</scope>
  </dependency>

  <!-- JAX-RS -->
  
  <dependency>
   <groupId>org.jboss.resteasy</groupId>
   <artifactId>jaxrs-api</artifactId>
   <!-- <scope>provided</scope> -->
   <version>${resteasy.version}</version>
  </dependency>
  <dependency>
   <groupId>org.jboss.resteasy</groupId>
   <artifactId>resteasy-jaxrs</artifactId>
   <!-- <scope>provided</scope> -->
   <version>${resteasy.version}</version>
  </dependency>
  <dependency>
   <groupId>org.jboss.resteasy</groupId>
   <artifactId>resteasy-jaxb-provider</artifactId>
   <!-- <scope>provided</scope> -->
   <version>${resteasy.version}</version>
  </dependency>

 </dependencies>
 <build>
  <finalName>simpleRestWeb</finalName>
 </build>
</project>


Step 7: Define web.xml file

<!DOCTYPE web-app PUBLIC
 "-//Sun Microsystems, Inc.//DTD Web Application 2.3//EN"
 "http://java.sun.com/dtd/web-app_2_3.dtd" >

<web-app>
 <display-name>Archetype Created Web Application</display-name>

 <context-param>
  <param-name>resteasy.scan</param-name>
  <param-value>true</param-value>
 </context-param>

 <context-param>
  <param-name>resteasy.servlet.mapping.prefix</param-name>
  <param-value>/rest</param-value>
 </context-param>


 <listener>
  <listener-class>org.jboss.resteasy.plugins.server.servlet.ResteasyBootstrap</listener-class>
 </listener>

 <servlet>
  <servlet-name>resteasy-simple</servlet-name>
  <servlet-class>org.jboss.resteasy.plugins.server.servlet.HttpServletDispatcher</servlet-class>
 </servlet>


 <servlet-mapping>
  <servlet-name>resteasy-simple</servlet-name>
  <url-pattern>/rest/*</url-pattern>
 </servlet-mapping>
</web-app>


This indicates that relative path will be something like /rest/*

Step 8: If you are deploying to a jboss container, define  jboss-web.xml. Otherwise the context root will be simpleRestWeb.

<jboss-web>
   <context-root>tutorial</context-root>
</jboss-web>

Step 9: Define a simple RESTful web  service interface.

package com.mytutorial;

import javax.ws.rs.GET;
import javax.ws.rs.Path;
import javax.ws.rs.PathParam;

@Path("/myapp")
public interface SimpleRestWeb {

 @GET
 @Path("/name/{name}")
 public String sayHello(@PathParam("name") String name);

}

Step 10: The web service implementation

package com.mytutorial;

public class SimpleRestWebImpl implements SimpleRestWeb {

 @Override
 public String sayHello(String name) {
  String result = "Hello " + name;
  return result;
 }

}

Step 11:  Execute mvn clean install from a DOS prompt to build the war file.

Step 12: Deploy the war file to JBoss or any other server.

Step 13:  The url to test

JBoss server with jboss-web.xml

http://localhost:8080/tutorial/rest/myapp/name/arul

The output is: Hello arul

If deployed to any other application server without the  jboss-web.xml

http://localhost:8080/simpleRestWeb/rest/myapp/name/arul


Labels: , ,

Jun 10, 2013

Testing RESTful web services with the cURL command line tool


The modern web application development is full of RESTful web services, and it very handy to know a few tools to test the RESTful web services.


Q. What is a cURL command line tool?
A. RESTful web applications are widely used and developed in many languages including Java, and cURL is a command line tool to quickly test RESTful web service functionality. cURL is a Unix operating system based tool. Here are some examples,

Note that this is a HEAD request, and -X is used to define the HTTP method or verb like HEAD, GET, POST, PUT, etc. The following example shows testing a health check URL to see if the RESTful web service is up. "-i" is used to show the response headers. "-H" is used to pass the request headers with the request.

curl  -i -H Content-Type:application/json -X HEAD "http://localhost:8080/my-server/myapp/healthcheck"

Response:

HTTP/1.1 200 OK
Server: Apache-Coyote/1.1
Content-Length: 0
Date: Wed, 27 Mar 2013 23:54:38 GMT

Here is an example of a GET request:

curl -i -X GET -H Accept:application/json 'http://localhost:8080/my-server/myapp/person?first_name=john&last_nane=smith'

Response:

HTTP/1.1 200 OK
Server: Apache-Coyote/1.1
Cache-Control: no-cache
Content-Type: application/json
Transfer-Encoding: chunked
Date: Thu, 21 Mar 2013 01:39:22 GMT

{"id":100,"first-name":"John", "last-name:Smith", "title":"Mr."}


Note: The resource uri needs to be quoted if you pass in multiple query parameters separated by ‘&’. If you have spaces in the query values, you should encode them i.e. either use the ‘+’ symbol or %20 instead of the space. Also, For GET requests, the -X GET is optional.


Here is an example of a POST request: "-d" is used for the data to be posted

curl -i -H "Accept: application/json" -X POST -d "firstName=james" http://localhost:8080/my-server/myapp/persons/person

The PUT request is done very similar to a POST request as shown above, but with -X PUT. A POST request is used to create a new person record and a PUT request is made to edit an existing person record as shown below.

curl -i -H "Accept: application/json" -X PUT -d "firstName=john" http://localhost:8080/my-server/myapp/persons/person/100


Here is an example of a DELETE request:

curl -i -H "Accept: application/json" -X DELETE http://localhost:8080/my-server/myapp/persons/person/100


There are other good tools to test RESTful web services like the Poster plugin from Firefox Add-on. Another great tool that I have blogged about is the RESTClient stand alone jar.  These two are great GUI tools if you do not want to get down and dirty with cURL or if you are testing from Windows you could install Cygwin and then install and use cURL.

Labels: , , , ,

Apr 17, 2013

RESTFul Web Service URI conventions with Spring MVC examples

The high level pattern for the RESTful URI is
  • http(s)://myserver.com:8080/app-name/{version-no}/{domain}/{rest-reource-convetion}
For example:

  • http(s)://myserver.com:8080/accounting-services/1.0/forecasting/accounts
to list  all the accounts. This is a plural resource returning a collections of accounts. The URI contains nouns representing the resources in a hierarchical structure. For example, if you want a to get a particular transaction value under an account you can do

  • http(s)://myserver.com:8080/accounting-services/1.0/forecasting/account/123/transaction/567
Where  123 is the account number and 567 is the transaction number or id. This is a singular resource returning a single transaction.

What if you want to list a collection of transactions that are greater than a particular date?

  • http(s)://myserver.com:8080/accounting-services/1.0/forecasting/account/123/transactions/search?txn-date=20120201
The  verbs are defined via the HTTP methods GET, POST, PUT, and DELETE. The above examples are basically GET requests returning accounts or transactions. If you want to create a new transaction request, you do a POST with the following URL.

  • http(s)://myserver.com:8080/accounting-services/1.0/forecasting/account/123/transaction
 The actual transaction data will be sent in the body of the request as JSON data. The above URI will be used with a PUT http method to modify an existing transaction record.


Finally, you can also control which method gets executed with the help of HTTP headers or host names in the URL. Let's see some Spring MVC examples in a controller class as to how it maps a request URI, headers, etc to execute the relevant method on the server side.


Here is the sample code with GET requests


@Controller
@RequestMapping("/forecasting")
public class CashForecastController

{

    @RequestMapping(
            value = "/accounts,
            method = RequestMethod.GET,
            produces = "application/json")
    @ResponseBody
    public AccountResult getAllAccounts(HttpServletResponse response) throws Exception
    {    
        //get the accounts via a service and a dao layers
    }  

 @RequestMapping(
            value = "/accounts.csv,
            method = RequestMethod.GET,
            produces = "text/csv")
    @ResponseBody
    public void getAllAccounts(HttpServletResponse response) throws Exception
    {    
        //produces a CSV download file
    }  
 

    @RequestMapping(
            value = "/account/{accountCd}",
            method = RequestMethod.GET,
            produces = "application/json")
    @ResponseBody
    public Account getAccount(
            @PathVariable(value = "accountCd") String accountCode, HttpServletResponse response) throws Exception
    {
        //get the accounts via a service and a dao layers
 }
 
 
 //accept only if there is a special header
 @RequestMapping(
            value = "/account/{accountCd}",
            method = RequestMethod.GET,
    headers =
            {
                "operation=special"
            }
            produces = "application/json")
    @ResponseBody
    public Account getAccountSpecial(
            @PathVariable(value = "accountCd") String accountCode, HttpServletResponse response) throws Exception
    {
        //get the accounts via a service and a dao layers
  //special handling based
 }

    @RequestMapping(
            value = "/account/{accountCd}/transaction/{transactionId}",
            method = RequestMethod.GET,
            produces = "application/json")
    @ResponseBody
    public Transaction getTransaction(
            @PathVariable(value = "accountCd") String accountCode, 
   @PathVariable(value = "transactionId") String txnId, 
   HttpServletResponse response) throws Exception
    {
        //get the accounts via a service and a dao layers
  //accountCode and txnId can be used here
 }
 
 @RequestMapping(
            value = "/account/{accountCd}/transactions/search",
            method = RequestMethod.GET,
            produces = "application/json")
    @ResponseBody
    public TransactionResult getTransactions(
            @PathVariable(value = "accountCd") String accountCode, 
   @RequestParam(value = "txn-date", required = true) @DateTimeFormat(pattern = "yyyyMMdd") Date txnDate,
   HttpServletResponse response) throws Exception
    {
        //get the accounts via a service and a dao layers
  //accountCode and txnDate can be used here
 }
} 


Here is the sample code with POST and PUT requests
@Controller
@RequestMapping("/forecasting")
public class CashForecastController

{
    @RequestMapping(
            value = "/account/transaction",
            method = RequestMethod.POST)
    public @ResponseBody Transaction addTransaction(@RequestBody Transaction txn, HttpServletResponse response)
            throws Exception
    {
       
        //logic to create a new Transaction records via service and dao layers
        
    }
 
 
  @RequestMapping(
            value = "/account/transaction",
            method = RequestMethod.PUT)
    public @ResponseBody Transaction modifyTransaction(@RequestBody Transaction txn, HttpServletResponse response)
            throws Exception
    {
       
        //logic to modify a Transaction record via service and dao layers
        
    }
} 


Do's and Don'ts

  • Don't use query parameters to alter state. Use query parameters for sub-selection of a resource like pagination, filtering, search queries, etc
  • Don't use implementation-specific extensions in your URIs (.do, .py, .jsf, etc.). You can use .csv, .json, etc.
  • Don't ever use GET to alter state. Use GET for as much as possible. Favor POST over PUT when in doubt. 
  • Don't perform an operation that is not idempotent with PUT. 
  • Do use DELETE in preference to POST to remove resources.
  • Don't clutter your URL with verbs or stuff that should be in a header or body. Move stuff out of the URI that should be in an HTTP header or a body. Whenever it looks like you need a new verb in the URL, think about turning that verb into a noun instead. For example, turn 'activate' into 'activation', and 'validate' into 'validation'.

Labels: , ,

Apr 16, 2013

RESTClient tool to test RESTful web services

Related posts to test web services

The http://www.wiztools.org/ has some handy open source Java tools like RESTClient, Regular Expression Tester, etc. RESTClient tool is GUI based and a good alternative to the Unix command line based tool CURL and the Firefox poster plugin. SoapUI is another GUI based client for both RESTful and SOAP based web services. This blog posts shows how easy it is to get started with RESTClient tool from WizTools. The example below shows a POST request as the GET requests are easier to test. The diagrams below illustrates posting of JSON data. The RESTful web service operations GET, POST, PUT, and DELETE correlates with the database CRUD operations Read, Create, Update, and Delete respectively.

Step 1: From WizTools click on the link to RESTClient.


Step 2: Download the JAR file "restclient-cli-3.1-jar-with-dependencies.jar". Create a short cut to the jar file. Double clicking on the short cut will open the RESTClient GUI as shown below. You can type in the URL and select "POST" as the HTTP method.


Take note of the HTTP headers passed with the request.


Step 3: You need to select the "Content-Type" that you want to post. Select  "application/json" as the content-type.


The GET requests are very straight forward requiring only the URL.


The SoapUI tool requires a WADL file for the RESTFul web services. Here is an example of SOAP Web Service using the SoapUI tool.


Related posts to test web services

Labels: , , ,

Dec 13, 2012

Unit testing Spring MVC controllers for web and RESTful services with spring-test-mvc

As Web application and RESTful web services are very common in enterprise applications, it is imperative to unit test the controllers. There are a number of strategies to unit test your controllers in an MVC framework. For example, running an embedded web server like jetty, and then run the unit tests against the web server, etc. The spring-test-mvc project makes testing your Spring MVC controllers very easy without starting an embedded server. This blog post will take you through the key steps involved.


Step 1: You need to have the right third-party libraries. The key ones to take note are spring-test-mvc, spring-test, json-path, hamcrest-library, hamcrest-core, and mockito-core.

 
        <dependency>
   <groupId>org.mockito</groupId>
   <artifactId>mockito-core</artifactId>
   <scope>test</scope>
   <exclusions>
    <exclusion>
     <groupId>org.hamcrest</groupId>
     <artifactId>hamcrest-core</artifactId>
    </exclusion>
   </exclusions>
  </dependency>
  
  <dependency>
   <groupId>org.hamcrest</groupId>
   <artifactId>hamcrest-library</artifactId>
   <version>1.3</version>
  </dependency>
  
  <dependency>
   <groupId>org.codehaus.jackson</groupId>
   <artifactId>jackson-mapper-asl</artifactId>
   <version>1.9.8</version>
   <scope>runtime</scope>
  </dependency>

  <dependency>
   <groupId>javax.xml.bind</groupId>
   <artifactId>jaxb-api</artifactId>
   <version>2.2.6</version>
   <scope>runtime</scope>
  </dependency>

  <!-- JSON XPATH library -->
  <dependency>
   <groupId>com.jayway.jsonpath</groupId>
   <artifactId>json-path</artifactId>
   <version>0.5.6</version>
  </dependency>
  
  <!-- spring -->
  
  <dependency>
   <groupId>org.springframework</groupId>
   <artifactId>org.springframework.context</artifactId>
   <version>3.1.0.RELEASE</version>
   <exclusions>
    <!-- Exclude Commons Logging in favour of SLF4j -->
    <exclusion>
     <groupId>org.apache.commons</groupId>
     <artifactId>com.springsource.org.apache.commons.logging</artifactId>
    </exclusion>
   </exclusions>
  </dependency>
  <dependency>
   <groupId>org.springframework</groupId>
   <artifactId>spring-aop</artifactId>
   <version>3.1.0.RELEASE</version>
  </dependency>
  <dependency>
   <groupId>org.springframework</groupId>
   <artifactId>spring-aspects</artifactId>
   <version>3.1.0.RELEASE</version>
  </dependency>
  <dependency>
   <groupId>org.springframework</groupId>
   <artifactId>spring-beans</artifactId>
   <version>3.1.0.RELEASE</version>
  </dependency>
  <dependency>
   <groupId>org.springframework</groupId>
   <artifactId>spring-core</artifactId>
   <version>3.1.0.RELEASE</version>
   <exclusions>
    <exclusion>
     <artifactId>commons-logging</artifactId>
     <groupId>commons-logging</groupId>
    </exclusion>
   </exclusions>
  </dependency>
  
  <!-- for tspring testing -->
  <dependency>
   <groupId>org.springframework</groupId>
   <artifactId>spring-test</artifactId>
   <version>3.1.0.RELEASE</version>
  </dependency>
  
  <dependency>
   <groupId>org.springframework</groupId>
   <artifactId>spring-test-mvc</artifactId>
   <version>1.0.0.M1</version>
  </dependency>


Step 2: The next step is to define a Spring MVC controller that we will be writing unit test for.

 
package com.myapp.accounting.aes.securities.pricehistory.controller;

import java.sql.SQLException;
import java.util.Date;
import java.util.List;

import javax.annotation.Resource;
import javax.servlet.http.HttpServletResponse;

import org.slf4j.Logger;
import org.slf4j.LoggerFactory;
import org.springframework.format.annotation.DateTimeFormat;
import org.springframework.http.HttpStatus;
import org.springframework.jdbc.CannotGetJdbcConnectionException;
import org.springframework.security.authentication.LockedException;
import org.springframework.stereotype.Controller;
import org.springframework.web.bind.annotation.ExceptionHandler;
import org.springframework.web.bind.annotation.RequestMapping;
import org.springframework.web.bind.annotation.RequestMethod;
import org.springframework.web.bind.annotation.RequestParam;
import org.springframework.web.bind.annotation.ResponseBody;
import org.springframework.web.bind.annotation.ResponseStatus;

import com.myapp.accounting.securities.pricehistory.model.PriceHistory;
import com.myapp.accounting.securities.pricehistory.service.PriceHistoryService;
import com.myapp.accounting.dm.model.refdata.securities.MarketDataSecurityPriceHist;
 

 @Controller
public class PriceHistoryController {
 
    /**
     * Service for accessing the Market Data repository. Contains the business logic.
     */
    @Resource(name = "aes_priceHistoryService")
    private PriceHistoryService securityPriceService;


 @RequestMapping(value = "/pricehistory", 
                 method = RequestMethod.GET)
 @ResponseBody
 public List<MarketDataSecurityPriceHist> getPriceHistory(@RequestParam(value="latestUpdatedTimeStamp", required=true) @DateTimeFormat(pattern="dd MMM yyyy HH:mm:ss") Date latestUpdatedTimeStamp,
                                                     @RequestParam(value="maxRecords", required=false, defaultValue="100") int maxRecords) throws Exception 
 {  
     // call the business service
     PriceHistory result = securityPriceService.getPriceHistory(maxRecords, latestUpdatedTimeStamp);
      
     return result.getHistory();
 }
}


Step 3: The PriceHistory object that holds a list of "MarketDataSecurityPriceHist" objects.

 
package com.myapp.accounting.aes.securities.pricehistory.model;

import com.myapp.accounting.dm.model.refdata.securities.MarketDataSecurityPriceHist;
import java.io.Serializable;
import java.util.ArrayList;
import java.util.List;

import javax.xml.bind.annotation.XmlElement;
import javax.xml.bind.annotation.XmlElementWrapper;
import javax.xml.bind.annotation.XmlRootElement;

@XmlRootElement
public class PriceHistory implements Serializable
{
    private static final long serialVersionUID = 1L;
    

    private List<marketdatasecuritypricehist> history = new ArrayList<marketdatasecuritypricehist>();

    @XmlElementWrapper(name = "historicalprices")
    @XmlElement(name = "price")
    public List<marketdatasecuritypricehist> getHistory()
    {
        return history;
    }

 public void setHistory(List history) {
  this.history = history;
 }
}


Step 4: Define the MarketDataSecurityPriceHist class that holds the relevant attributes.

 
package com.myapp.accounting.dm.model.refdata.securities;

import java.io.Serializable;
import java.math.BigDecimal;
import java.util.Date;

import javax.persistence.Entity;
import javax.xml.bind.annotation.XmlElement;

@Entity //persistence entity
public class MarketDataSecurityPriceHist implements Serializable 
{
 private static final long serialVersionUID = 1444498748039607997L;

    private String securityCd;
    private Date priceDttm;
    private BigDecimal bidPrice;
    private BigDecimal closePrice;
    private BigDecimal lastPrice;
    private BigDecimal askPrice;
    private String lastUpdatedAction;
    private String LastUpdatedDetailUser;
    private Date lastUpdatedTimeStamp;
    private Date loadTimeStamp;
    private String pricecondition;
    private String recordType;
    private String priceTime;
    private String source;
    
 public MarketDataSecurityPriceHist()  {}

 @XmlElement
 public String getSecurityCd() 
 {
  return securityCd;
 }

 public void setSecurityCd(String securityCd) 
 {
  this.securityCd = securityCd;
 }

 @XmlElement
 public Date getPriceDttm() {
  return priceDttm;
 }

 public void setPriceDttm(Date priceDttm) {
  this.priceDttm = priceDttm;
 }
 
 @XmlElement
 public BigDecimal getBidPrice() {
  return bidPrice;
 }

 public void setBidPrice(BigDecimal bidPrice) {
  this.bidPrice = bidPrice;
 }

 //other setters and getters are omitted 
}


Step 5: Finally, and most importantly the unit test class that uses mockito to mock the PriceHistoryService implementation and spring-test-mvc to mock the controller that returns a json response.

 
package com.myapp.accounting.aes.securities.pricehistory;

import static org.mockito.Mockito.mock;
import static org.mockito.Mockito.when;
import static org.springframework.test.web.server.request.MockMvcRequestBuilders.get;
import static org.springframework.test.web.server.setup.MockMvcBuilders.standaloneSetup;
import static org.springframework.test.web.server.result.MockMvcResultMatchers.*;

import java.math.BigDecimal;
import java.util.ArrayList;
import java.util.Calendar;
import java.util.Date;
import java.util.List;

import org.junit.Before;
import org.junit.Test;
import org.mockito.Mockito;
import org.springframework.http.MediaType;

import com.myapp.accounting.aes.securities.pricehistory.controller.PriceHistoryController;
import com.myapp.accounting.aes.securities.pricehistory.model.PriceHistory;
import com.myapp.accounting.aes.securities.pricehistory.service.PriceHistoryService;
import com.myapp.accounting.aes.securities.pricehistory.service.impl.PriceHistoryServiceImpl;
import com.myapp.accounting.dm.model.refdata.securities.MarketDataSecurityPriceHist;

public class PriceHistoryController2Test {

 private PriceHistoryService mockSecurityPriceService;
 private PriceHistoryController controller;

 @Before
 public void setup() {
  controller = new PriceHistoryController();
  mockSecurityPriceService = mock(PriceHistoryServiceImpl.class);
  controller.setSecurityPriceService(mockSecurityPriceService);
 }

 @Test
 public void getPriceHistory() throws Exception {

  when(
    mockSecurityPriceService.getPriceHistory(
      (Integer) Mockito.any(), (Date) Mockito.any()))
    .thenReturn(getPriceHistoryTestData());

  standaloneSetup(controller)
    .build()
    .perform(
      get(
        "/pricehistory?latestUpdatedTimeStamp=26 Jul 211 12:00:00&maxRecords=3000")
        .accept(MediaType.APPLICATION_JSON))
    .andExpect(status().isOk())
    .andExpect(content().type("application/json"))
    .andExpect(jsonPath("$.[0].securityCd").value("test"))
    .andExpect(jsonPath("$.[0].bidPrice").value(12.50))
          .andExpect(jsonPath("$.[0].closePrice").value(12.50));
         
 }

 //mock data that gets returned when getPriceHistory(...) method is called
 private static PriceHistory getPriceHistoryTestData() {

  PriceHistory ph = new PriceHistory();
  List<marketdatasecuritypricehist> history = new ArrayList<marketdatasecuritypricehist>();
  MarketDataSecurityPriceHist md = new MarketDataSecurityPriceHist();
  md.setSecurityCd("test");
  BigDecimal price = new BigDecimal("12.50");
  md.setAskPrice(price);
  md.setBidPrice(price);
  md.setClosePrice(price);
  md.setLastUpdatedAction("SOME_ACTION");
  md.setRecordType("RECORD_TYPE");
  md.setLastUpdatedDetailUser("tesr");
  Calendar cal = Calendar.getInstance();
  cal.set(2010, 01, 01, 00, 00, 00);
  Date date = cal.getTime();
  md.setLastUpdatedTimeStamp(date);
  md.setPriceDttm(date);
  System.out.println(date);
  
  history.add(md);
  ph.setHistory(history);

  return ph;
 }

}

That's all to it for testing an MVC controller. The URL for above JSON RESTful web service will be something like

 
http://localhost:8080/accounting-server/securities/pricehistory?latestUpdatedTimeStamp=26+Jul+2010+12:00:00&maxRecords=3000

and the JSON data returned will be something like

 
[{"securityCd":"XX123","priceDttm":"2012-01-28","bidPrice":125.50,"closePrice":126.60,"lastPrice":124.50,"askPrice":123.80,"lastUpdatedAction":"NO ACTION","lastUpdatedTimeStamp":1327705288015,"loadTimeStamp":88150,"pricecondition":"NO_CONDITION","recordType":null,"priceTime":"10:01:28.150 AM","source":"HiPort","lastUpdatedDetailUser":"arul"},
{"securityCd":"YY321","priceDttm":"2012-01-28","bidPrice":125.50,"closePrice":126.60,"lastPrice":124.50,"askPrice":123.80,"lastUpdatedAction":"NO ACTION","lastUpdatedTimeStamp":1327705288015,"loadTimeStamp":88150,"pricecondition":"NO_CONDITION","recordType":null,"priceTime":"10:01:28.150 AM","source":"HiPort","lastUpdatedDetailUser":"arul"}]


Labels: , ,

Nov 17, 2012

SOAP versus RESTful Web service -- comparison

Recently I attended an interview with a large investment bank, and I was quizzed on SOAP versus RESTful web service. The interview questions were targeted at ascertaining my understanding of the differences, pros and cons of each, and when to use what.

Web services are very popular and widely used to integrate similar (i.e. Java applications) and disparate systems (i.e. legacy applications and applications written in .Net etc). It is imperative to understand the differences, pros, and cons between each approach.

Key Area
SOAP based Web service
RESTful Web service
Specification/Platform Fundamentals (SF/PF)
Transport is platform & protocol neutral. Supports multiple protocols like HTTP(S), Messaging, TCP, UDP, SMTP, etc.

Permits only XML data format, hence language neutral.


You define operations, which tunnels through the POST or GET. The focus is on accessing the named operations and exposing the application logic as a service.


Defines the contract via WSDL.
Transport is protocol specific. Supports only HTTP or HTTPS protocols.


Permits multiple data formats like XML, JSON data, text, HTML, atom, RSS, etc.

Any browser can be used because the REST approach uses the standard GET, PUT, POST, and DELETE web operations. The focus is on accessing the named resources and exposing the data as a service.

Traditionally, the big drawback of REST was the lack of contract for the web service. This has changed with WSDL 2.0 defining non SOAP bindings and the emergence of WADL.


Simpler to implement. REST has Ajax support. It can use the XMLHttpRequest object.

Good for stateless CRUD (Create, Read, Update, and Delete) operations.

Performance Consideration (PC)
SOAP based reads cannot be cached. The application that uses SOAP needs to provide cacheing.
REST based reads can be cached. Performs and scales better.
Security (SE)
Supports both SSL security and WS-security, which adds some enterprise security features. Supports identity through intermediaries, not just point to point SSL.


WS-Security maintains its encryption right up to the point where the request is being processed.


WS-Security allows you to secure parts (e.g. only credit card details) of the message that needs to be secured. Given that encryption/decryption is not a cheap operation, this can be a performance boost for larger messages.

It is also possible with WS-Security to secure different parts of the message using different keys or encryption algorithms. This allows separate parts of the message to be read by different people without exposing other, unneeded information.

SSL security can only be used with HTTP. WS-Security can be used with other protocols like UDP, SMTP, etc.

Supports only point-to-point SSL security.

The basic mechanism behind SSL is that the client encrypts all of the requests based on a key retrieved from a third party. When the request is received at the destination, it is decrypted and presented to the service. This means the request is only encrypted while it is traveling between the client and the server. Once it hits the server (or a proxy which has a valid certificate), it is decrypted from that moment on.

The SSL encrypts the whole message, whether all of it is sensitive or not.

Transaction Management (TM)
Has comprehensive support for both ACID based transaction management for short-lived transactions and compensation based transaction management for long-running transactions. It also supports two-phase commit across distributed resources.
REST supports transactions, but it is neither ACID compliant nor can provide two phase commit across distributed transactional resources as it is limited by its HTTP protocol.
Quality of Service (QoS)
SOAP has success or retry logic built in and provides end-to-end reliability even through SOAP intermediaries.
REST does not have a standard messaging system, and expects clients invoking the service to deal with communication failures by retrying.
Best Practice (BP)
In general, a REST based web service is preferred due to its simplicity, performance, scalability, and support for multiple data formats. SOAP is favored where service requires comprehensive support for security, transactional reliability and stricter contract.


Q.  Differentiate between SOA (Service Oriented Architecture) versus WOA (Web Oriented Architecture)?
A. WOA extends SOA to be a light-weight architecture using technologies such as REST and POX (Plain Old XML). POX compliments REST. JSON is a variant for data returned by REST Web Services. It consumes less bandwidth and is easily handled by web developers mastering the Javascript language

SOA and WOA differ in terms of the layers of abstraction. SOA is a system-level architectural style that tries to expose business capabilities so that they can be consumed by many applications. WOA is an interface-level architectural style that focuses on the means by which these service capabilities are exposed to consumers. You can start out with a WOA and then grow into SOA.

Labels: ,

Oct 17, 2012

SOAP (JAX-WS) Web Service Tutorial with Apache CXF, eclipse and maven

In the previous tutorial RESTful service with Apache CXF was demonstrated. This tutorial modifies the same one for SOAP based Web Service.


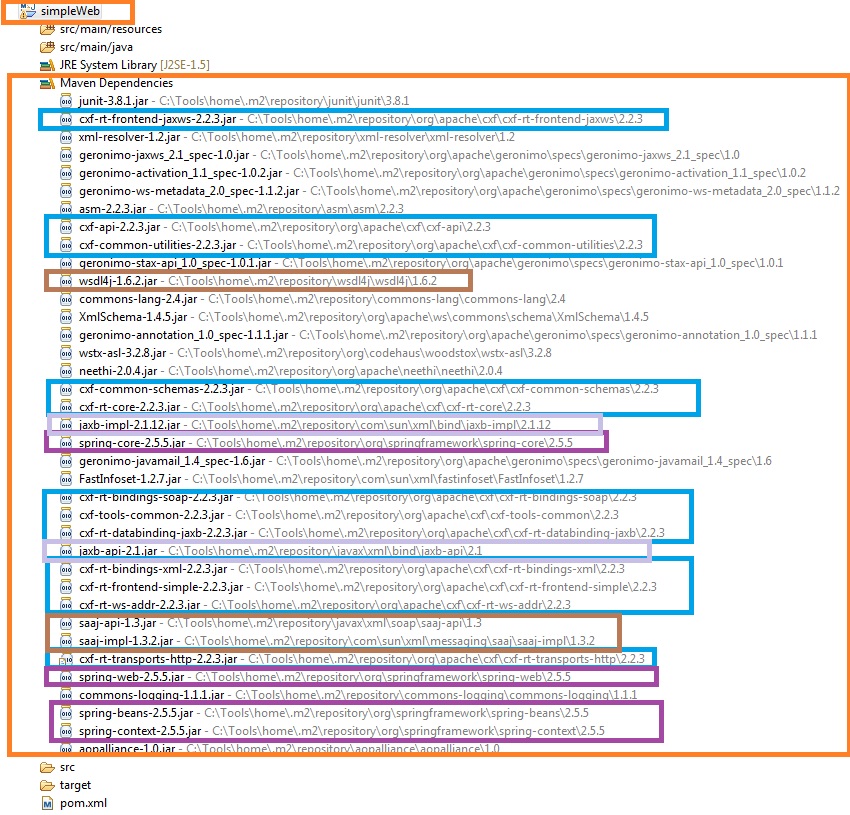
Step 1: You need to bring in the relevant CXF framework JAR files. The transitive dependencies will bring in the other dependent Spring jar files, JAXB jar files, and many other jar files listed in the screenshot below.

The pom.xml file is shown below:

<project xmlns="http://maven.apache.org/POM/4.0.0" xmlns:xsi="http://www.w3.org/2001/XMLSchema-instance"
 xsi:schemaLocation="http://maven.apache.org/POM/4.0.0 http://maven.apache.org/maven-v4_0_0.xsd">
 <modelVersion>4.0.0</modelVersion>
 <groupId>com.mytutorial</groupId>
 <artifactId>simpleWeb</artifactId>
 <packaging>war</packaging>
 <version>1.0-SNAPSHOT</version>
 <name>simpleWeb Maven Webapp</name>
 <url>http://maven.apache.org</url>


 <properties>
  <cxf.version>2.2.3</cxf.version>
 </properties>

 <dependencies>
  <dependency>
   <groupId>junit</groupId>
   <artifactId>junit</artifactId>
   <version>3.8.1</version>
   <scope>test</scope>
  </dependency>

 
  <!-- CXF SOAP Web Service JARS -->
  <dependency>
  <groupId>org.apache.cxf</groupId>
  <artifactId>cxf-rt-frontend-jaxws</artifactId>
  <version>${cxf.version}</version>
 </dependency>
 <dependency>
  <groupId>org.apache.cxf</groupId>
  <artifactId>cxf-rt-transports-http</artifactId>
  <version>${cxf.version}</version>
 </dependency>
  

 </dependencies>
 <build>
  <finalName>simpleWeb</finalName>
 </build>
</project>


Now, if you right-mouse-click on simpleWeb,  and select "Maven --> Update Depencies", you can see all the transitively dependent jar files in the "Java Perspective" as shown below.


As you can see, it transitively brings in Spring and JAXB jars in addition to other relevant jars.

Step 2: Define the SOAP (i.e. JAX-WS) Web Service interface and implementation classes with relevant annotations.

Interface HelloUserWebService.java

package com.mytutorial.webservice;

import javax.jws.WebService;

import com.mytutorial.pojo.User;

@WebService
public interface HelloUserWebService {
 //parameter that gets passed via the URL
 User greetUser(String userName);
}

Implementation HelloUserWebServiceImpl.java

package com.mytutorial.webservice;

import javax.jws.WebParam;
import javax.jws.WebService;

import com.mytutorial.pojo.User;

@WebService(endpointInterface = "com.mytutorial.webservice.HelloUserWebService")
public class HelloUserWebServiceImpl implements HelloUserWebService {

 
 public User greetUser(@WebParam(name="name") String userName) {
  User user = new User();
  user.setName(userName);
  return user;
 }

}


Step 3: Define the web service endpoint via cxf.xml, which internally uses the Spring framework. Define this under sr/main/resources folder under a package com.mytutorial.webservice.

<beans xmlns="http://www.springframework.org/schema/beans"
      xmlns:xsi="http://www.w3.org/2001/XMLSchema-instance"
      xmlns:jaxws="http://cxf.apache.org/jaxws"
      xsi:schemaLocation="http://www.springframework.org/schema/beans
                          http://www.springframework.org/schema/beans/spring-beans.xsd
                          http://cxf.apache.org/jaxws
            http://cxf.apache.org/schemas/jaxws.xsd">

  <import resource="classpath:META-INF/cxf/cxf.xml" />
  <import resource="classpath:META-INF/cxf/cxf-extension-soap.xml"/>
  <import resource="classpath:META-INF/cxf/cxf-servlet.xml" />
  
  <jaxws:endpoint id="auth"
                  implementor="com.mytutorial.webservice.HelloUserWebServiceImpl"
                  address="/userservices"/>
</beans>


Step 4: The web.xml file and the User.java files are same as the RESTful Web Service tutorial. You should now have the relevant artifacts as shown below.


Step 5: Deploy the simpleWeb.war to the Tomcat server from within eclipse or from outside eclipse as described in the simple web JEE tutorial.

Step 6:  Open a wen browser like google chrome, and type the following URL -> http://localhost:8080/simpleWeb/. This will list the JAX-WS and JAX-RS  Web services that are available.


Step 7:  You can now open a WSDL (Web Services Description Language) file on the browser with the following URL --> http://localhost:8080/simpleWeb/userservices?wsdl

<?xml version='1.0' encoding='UTF-8'?><wsdl:definitions name="HelloUserWebServiceImplService" targetNamespace="http://webservice.mytutorial.com/" xmlns:ns1="http://cxf.apache.org/bindings/xformat" xmlns:soap="http://schemas.xmlsoap.org/wsdl/soap/" xmlns:tns="http://webservice.mytutorial.com/" xmlns:wsdl="http://schemas.xmlsoap.org/wsdl/" xmlns:xsd="http://www.w3.org/2001/XMLSchema">
  <wsdl:types>
<xs:schema elementFormDefault="unqualified" targetNamespace="http://webservice.mytutorial.com/" version="1.0" xmlns:tns="http://webservice.mytutorial.com/" xmlns:xs="http://www.w3.org/2001/XMLSchema">
<xs:element name="greetUser" type="tns:greetUser" />
<xs:element name="greetUserResponse" type="tns:greetUserResponse" />
<xs:element name="user" type="tns:user" />
<xs:complexType name="greetUser">
<xs:sequence>
<xs:element minOccurs="0" name="arg0" type="xs:string" />
</xs:sequence>
</xs:complexType>
<xs:complexType name="greetUserResponse">
<xs:sequence>
<xs:element minOccurs="0" name="return" type="tns:user" />
</xs:sequence>
</xs:complexType>
<xs:complexType name="user">
<xs:sequence>
<xs:element minOccurs="0" name="name" type="xs:string" />
</xs:sequence>
</xs:complexType>
</xs:schema>
  </wsdl:types>
  <wsdl:message name="greetUser">
    <wsdl:part element="tns:greetUser" name="parameters">
    </wsdl:part>
  </wsdl:message>
  <wsdl:message name="greetUserResponse">
    <wsdl:part element="tns:greetUserResponse" name="parameters">
    </wsdl:part>
  </wsdl:message>
  <wsdl:portType name="HelloUserWebService">
    <wsdl:operation name="greetUser">
      <wsdl:input message="tns:greetUser" name="greetUser">
    </wsdl:input>
      <wsdl:output message="tns:greetUserResponse" name="greetUserResponse">
    </wsdl:output>
    </wsdl:operation>
  </wsdl:portType>
  <wsdl:binding name="HelloUserWebServiceImplServiceSoapBinding" type="tns:HelloUserWebService">
    <soap:binding style="document" transport="http://schemas.xmlsoap.org/soap/http" />
    <wsdl:operation name="greetUser">
      <soap:operation soapAction="" style="document" />
      <wsdl:input name="greetUser">
        <soap:body use="literal" />
      </wsdl:input>
      <wsdl:output name="greetUserResponse">
        <soap:body use="literal" />
      </wsdl:output>
    </wsdl:operation>
  </wsdl:binding>
  <wsdl:service name="HelloUserWebServiceImplService">
    <wsdl:port binding="tns:HelloUserWebServiceImplServiceSoapBinding" name="HelloUserWebServiceImplPort">
      <soap:address location="http://localhost:8080/simpleWeb/userservices" />
    </wsdl:port>
  </wsdl:service>
</wsdl:definitions>


Step 8: From the above WSDL, you can either create a SOAP UI Client to test the above JAX-WS service, or write a stand-alone client Java class to test it programmatically.

package com.mytutorial.client;

import org.apache.cxf.interceptor.LoggingInInterceptor;
import org.apache.cxf.interceptor.LoggingOutInterceptor;
import org.apache.cxf.jaxws.JaxWsProxyFactoryBean;

import com.mytutorial.pojo.User;
import com.mytutorial.webservice.HelloUserWebService;

public final class SoapClientTest {

 private SoapClientTest() {
 }

 public static void main(String args[]) throws Exception {

  JaxWsProxyFactoryBean factory = new JaxWsProxyFactoryBean();

  factory.getInInterceptors().add(new LoggingInInterceptor());
  factory.getOutInterceptors().add(new LoggingOutInterceptor());
  factory.setServiceClass(HelloUserWebService.class);
        //The URL should be externalized to a configuration file 
     factory.setAddress("http://localhost:8080/simpleWeb/userservices");
  HelloUserWebService client = (HelloUserWebService) factory.create();

  User user = client.greetUser("John");
  System.out.println("Response is: " + user.getName());

 }

}

The output will be:

15/10/2012 1:10:57 PM org.springframework.context.support.AbstractApplicationContext prepareRefresh
INFO: Refreshing org.apache.cxf.bus.spring.BusApplicationContext@9506dc4: display name [org.apache.cxf.bus.spring.BusApplicationContext@9506dc4]; startup date [Mon Oct 15 13:10:57 EST 2012]; root of context hierarchy
15/10/2012 1:10:57 PM org.apache.cxf.bus.spring.BusApplicationContext getConfigResources
INFO: No cxf.xml configuration file detected, relying on defaults.
15/10/2012 1:10:57 PM org.springframework.context.support.AbstractApplicationContext obtainFreshBeanFactory
INFO: Bean factory for application context [org.apache.cxf.bus.spring.BusApplicationContext@9506dc4]: org.springframework.beans.factory.support.DefaultListableBeanFactory@62da3a1e
15/10/2012 1:10:57 PM org.springframework.beans.factory.support.DefaultListableBeanFactory preInstantiateSingletons
INFO: Pre-instantiating singletons in org.springframework.beans.factory.support.DefaultListableBeanFactory@62da3a1e: defining beans [cxf,org.apache.cxf.bus.spring.BusApplicationListener,org.apache.cxf.bus.spring.BusWiringBeanFactoryPostProcessor,org.apache.cxf.bus.spring.Jsr250BeanPostProcessor,org.apache.cxf.bus.spring.BusExtensionPostProcessor,org.apache.cxf.resource.ResourceManager,org.apache.cxf.configuration.Configurer,org.apache.cxf.binding.BindingFactoryManager,org.apache.cxf.transport.DestinationFactoryManager,org.apache.cxf.transport.ConduitInitiatorManager,org.apache.cxf.wsdl.WSDLManager,org.apache.cxf.phase.PhaseManager,org.apache.cxf.workqueue.WorkQueueManager,org.apache.cxf.buslifecycle.BusLifeCycleManager,org.apache.cxf.endpoint.ServerRegistry,org.apache.cxf.endpoint.ServerLifeCycleManager,org.apache.cxf.endpoint.ClientLifeCycleManager,org.apache.cxf.transports.http.QueryHandlerRegistry,org.apache.cxf.endpoint.EndpointResolverRegistry,org.apache.cxf.headers.HeaderManager,org.apache.cxf.catalog.OASISCatalogManager,org.apache.cxf.endpoint.ServiceContractResolverRegistry,org.apache.cxf.jaxws.context.WebServiceContextResourceResolver,org.apache.cxf.jaxws.context.WebServiceContextImpl,org.apache.cxf.binding.soap.SoapBindingFactory,org.apache.cxf.binding.soap.SoapTransportFactory,org.apache.cxf.binding.soap.customEditorConfigurer,org.apache.cxf.binding.xml.XMLBindingFactory,org.apache.cxf.ws.addressing.policy.AddressingAssertionBuilder,org.apache.cxf.ws.addressing.policy.AddressingPolicyInterceptorProvider,org.apache.cxf.ws.addressing.policy.UsingAddressingAssertionBuilder,org.apache.cxf.transport.http.policy.HTTPClientAssertionBuilder,org.apache.cxf.transport.http.policy.HTTPServerAssertionBuilder,org.apache.cxf.transport.http.policy.NoOpPolicyInterceptorProvider,org.apache.cxf.transport.http.ClientOnlyHTTPTransportFactory]; root of factory hierarchy
15/10/2012 1:10:58 PM org.apache.cxf.service.factory.ReflectionServiceFactoryBean buildServiceFromClass
INFO: Creating Service {http://webservice.mytutorial.com/}HelloUserWebServiceService from class com.mytutorial.webservice.HelloUserWebService
15/10/2012 1:10:58 PM org.apache.cxf.interceptor.LoggingOutInterceptor$LoggingCallback onClose
INFO: Outbound Message
---------------------------
ID: 1
Address: http://localhost:8080/simpleWeb/userservices
Encoding: UTF-8
Content-Type: text/xml
Headers: {SOAPAction=[""], Accept=[*/*]}
Payload: John
--------------------------------------
15/10/2012 1:10:59 PM org.apache.cxf.interceptor.LoggingInInterceptor logging
INFO: Inbound Message
----------------------------
ID: 1
Encoding: UTF-8
Content-Type: text/xml;charset=UTF-8
Headers: {content-type=[text/xml;charset=UTF-8], Date=[Mon, 15 Oct 2012 02:10:59 GMT], Content-Length=[236], Server=[Apache-Coyote/1.1]}
Payload: John
--------------------------------------
Response is: John


Labels:

Oct 15, 2012

Restful Web Service Tutorial with Apache CXF

Nowadays, it is more common to work with RESTful Web Service than with SOAP based Web service. This is also a very popular job interview question and I have discussed the reasons at Web Services Interview Questions and Answers. Apache CXF is a popular framework for developing both style Web services. This tutorial extends the "simple Web" Java EE tutorial.

Step 1: You need to bring in the relevant CXF framework JAR files. The transitive dependencies will bring in the other dependent Spring jar files, JAXB jar files, and many other jar files listed in the screenshot below.

Modify the pom.xml file as shown below:

<project xmlns="http://maven.apache.org/POM/4.0.0" xmlns:xsi="http://www.w3.org/2001/XMLSchema-instance"
 xsi:schemaLocation="http://maven.apache.org/POM/4.0.0 http://maven.apache.org/maven-v4_0_0.xsd">
 <modelVersion>4.0.0</modelVersion>
 <groupId>com.mytutorial</groupId>
 <artifactId>simpleWeb</artifactId>
 <packaging>war</packaging>
 <version>1.0-SNAPSHOT</version>
 <name>simpleWeb Maven Webapp</name>
 <url>http://maven.apache.org</url>


 <properties>
  <cxf.version>2.2.3</cxf.version>
 </properties>

 <dependencies>
  <dependency>
   <groupId>junit</groupId>
   <artifactId>junit</artifactId>
   <version>3.8.1</version>
   <scope>test</scope>
  </dependency>

 
  <!-- CXF RESTful Web Service JARS -->
  <dependency>
   <groupId>org.apache.cxf</groupId>
   <artifactId>cxf-rt-frontend-jaxrs</artifactId>
   <version>${cxf.version}</version>
  </dependency>
  

 </dependencies>
 <build>
  <finalName>simpleWeb</finalName>
 </build>
</project>


Now, if you right-mouse-click on simpleWeb,  and select "Maven --> Update Depencies", you can see all the transitively dependent jar files in the "Java Perspective" as shown below.


As you can see, it transitively brings in Spring and JAXB jars in addition to other relevant jars.

Step 2: Define the RESTful Web Service interface and implementation classes with relevant annotations

Interface HelloUserWebService.java

package com.mytutorial.webservice;

import com.mytutorial.pojo.User;

public interface HelloUserWebService {
 //parameter that gets passed via the URL
 User greetUser(String userName);
}


Implementation HelloUserWebServiceImpl.java

package com.mytutorial.webservice;

import javax.ws.rs.GET;
import javax.ws.rs.Path;
import javax.ws.rs.PathParam;
import javax.ws.rs.Produces;

import com.mytutorial.pojo.User;

@Path("userservice/1.0")
@Produces("application/xml")
public class HelloUserWebServiceImpl implements HelloUserWebService {

 @GET
 @Path("/user/{userName}")
 public User greetUser(@PathParam("userName") String userName) {
  User user = new User();
  user.setName(userName);
  return user;
 }

}


Note: The path "userservice/1.0" and  "/user/{userName}" will be used in the URL when invoking the web service. For example, http://localhost:8080/userservices/userservice/1.0/user/John. The "1.0" is the web service version number.

Step 3: Define the "User" bean (or POJO -- Plain Old Java Object) class with the relevant annotations to marshall (i.e. convert object to XML) User object to relevant XML. Generally, these objects can be generated from a XSD file and running it through "xjc" compiler supplied with JAXB. This is demonstrated at "RESTful Web Service Overview".

package com.mytutorial.pojo;

import javax.xml.bind.annotation.XmlRootElement;

@XmlRootElement(name = "user")
public class User {

 private String name;

 public String getName() {
  return name;
 }

 public void setName(String name) {
  this.name = name;
 }
}


This will marshal the user object to XML like

<?xml version="1.0" encoding="UTF-8" standalone="yes"?>
<user>
  <name>John</name>
</user>


Step 4: Define the web service endpoint via cxf.xml, which internally uses the Spring framework. Define this under sr/main/resources folder under a package com.mytutorial.webservice.

<beans xmlns="http://www.springframework.org/schema/beans"
 xmlns:xsi="http://www.w3.org/2001/XMLSchema-instance" xmlns:jaxrs="http://cxf.apache.org/jaxrs"
 xsi:schemaLocation="http://www.springframework.org/schema/beans
                        http://www.springframework.org/schema/beans/spring-beans.xsd
                        http://cxf.apache.org/jaxrs
                        http://cxf.apache.org/schemas/jaxrs.xsd">

 <import resource="classpath:META-INF/cxf/cxf.xml" />
 <import resource="classpath:META-INF/cxf/cxf-extension-jaxrs-binding.xml" />
 <import resource="classpath:META-INF/cxf/cxf-servlet.xml" />


 <bean id="helloUserWebService" class="com.mytutorial.webservice.HelloUserWebServiceImpl" />

 <jaxrs:server id="userRestfulWebService" address="/userservices/">
  <jaxrs:serviceBeans>
   <ref bean="helloUserWebService" />
  </jaxrs:serviceBeans>
  <jaxrs:extensionMappings>
   <entry key="xml" value="application/xml" />
  </jaxrs:extensionMappings>
 </jaxrs:server>

</beans>


Step 5: Define the web.xml with the CXFServlet and tell where to find the cxf.xml file.

<web-app xmlns:xsi="http://www.w3.org/2001/XMLSchema-instance"
 xmlns="http://java.sun.com/xml/ns/javaee" xmlns:web="http://java.sun.com/xml/ns/javaee/web-app_2_5.xsd"
 xsi:schemaLocation="http://java.sun.com/xml/ns/javaee http://java.sun.com/xml/ns/javaee/web-app_2_5.xsd"
 id="WebApp_ID" version="2.5">

 <display-name>CXF Web Service Application</display-name>

 <context-param>
  <param-name>contextConfigLocation</param-name>
  <param-value>classpath:com/mytutorial/webservice/cxf.xml</param-value>
 </context-param>
 <listener>
  <listener-class>org.springframework.web.context.ContextLoaderListener</listener-class>
 </listener>
 <servlet>
  <servlet-name>CXFServlet</servlet-name>
  <servlet-class>org.apache.cxf.transport.servlet.CXFServlet</servlet-class>
 </servlet>
 <servlet-mapping>
  <servlet-name>CXFServlet</servlet-name>
  <url-pattern>/*</url-pattern>
 </servlet-mapping>

</web-app>


You should now have the relevant artifacts as shown below.


Step 6: Deploy the simpleWeb.war to the Tomcat server from within eclipse or from outside eclipse as described in the simple web JEE tutorial.


Step 7: Open a wen browser like google chrome, and type the following URL -> http://localhost:8080/simpleWeb/. This will list the RESTful services that are available.

 Click on the wadl (i.e. Web Application Description Language) link to get


Step 8: Finally, invoke the web service via the URL --> http://localhost:8080/simpleWeb/userservices/userservice/1.0/user/John to get an output as shown below. The username supplied is "John". If you are accessing it via a Java application, you can use a framework like Apache HttpClient to make an HTTP call.


Labels: