Java tutorial: Create a simple Web app using JEE
Install Apache Tomcat application server
To run JEE based web apps, you need an application server that contains a web container. There are a number of application servers like Apache Tomcat, JBoss, GlassFish, etc. This tutorial will use Apache Tomcat.
Step 1: Download and install Apache Tomcat from http://tomcat.apache.org/download-70.cgi. The installing is all about unzipping it to the right folder. If you are running on Windows 7, download the 64-bit windows zip.
Continue with creating a Web project.
Step 2: Generate a Web project structure using Maven as we did for simple Java project in the previous tutorial. Run the command under C:\Temp\Java\projects.
mvn archetype:generate -DgroupId=com.mytutorial -DartifactId=simpleWeb -DarchetypeArtifactId=maven-archetype-webapp
This would have created the simpleWeb and a number of other sub folders adhering to the maven convention.
As you can see, it had generated a webapp folder and the web.xml.
Step 3: Import this project into eclipse. This step is very similar to the simple Java tutorial.
Also, note that in the top right hand corner the tab says that eclipse is in Java EE perspective.
Integrate Tomcat server into eclipse so that you can it within eclipse.
Step 4: From eclipse top menu select "Window --> Preferences"
Step 5: Select the path to previously installed Tomcat server.
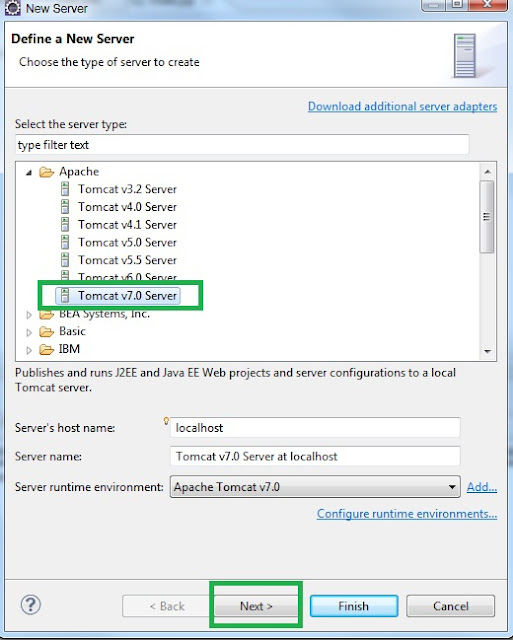
Step 6: Add this new server to the panel marked "Server". This where the "Console" tab is also located. This will also allow you to deploy the "simpleWeb" project to the Tomcat server.
Step 7: Deploy the simpleWeb project by selecting it from the left pane marked "Available" and adding to the right pane marked "Configured".
Step 8: Start the Tomcat server that was deployed with the simpleWeb within eclipse by right-mouse-clicking on the server and selecting "Start".
Step 9: The console tab will output the server logs.
Step 10: Once the server has started, you type the following URL in a browser of your choice. Now you have a very simple Web application running in Tomcat server.
http://localhost:8080/simpleWeb/index.jsp
Now, let's see how we can build the war package and deploy it to Tomcat from outside eclipse.
Step 11: Firstly, use Maven to build the war package. These steps are very similar to simple Java tutorial, except for deploying the Web ARchive (i.e. the war file) to Tomcat, and starting Tomcat outside eclipse. If your Tomcat is already running within eclipse stop it by selecting the server and then right-mouse-clicking to bring up the context menu, and then selecting the "Stop" button. You can check the "console" tab to see if the server has stopped.
Step 12: Now, use the "mvn" command to build the war file after changing the directory to "simpleWeb" in a command line. You need to be in the "simpleWeb" folder because that is where the pom.xml file is.
c:\Temp\Java\projects\simpleWeb>mvn clean install
Step 13: You can see the generate war file deployed to your local maven repository.
Step 14: To deploy the simpleWeb-1.0-SNAPSHOT.war file to Tomcat, copy it to the Tomcat's "webapps" folder, and then you can start the server by double clicking on "startup.bat", which will deploy the application when the server starts up. It simply unzips the simpleWeb-1.0-SNAPSHOT.war file by creating a new folder "simpleWeb-1.0-SNAPSHOT", which will have all the required files.
Step 15: Once the server is started, you can access the application in browser of your choice with the following URL.
http://localhost:8080/simpleWeb-1.0-SNAPSHOT/index.jsp
As you can notice, "simpleWeb-1.0-SNAPSHOT" is the exploded folder under the "webapps" folder within Tomcat file structure.
You may also like
Labels: Eclipse Tutorial, JEE Tutorial, Maven Tutorial


2 Comments:
In step 7, the simpleWeb app doesn't show up in the "Available" panel so that I can deploy it. I followed your steps exactly up to that point. What could go wrong and how can I fix it?
Thanks Erick
Post a Comment
Subscribe to Post Comments [Atom]
<< Home