Google

Nov 30, 2011

Are you feeling stagnated?

One of the dilemmas many professionals face is when to jump the ship? versus when to steady the ship? There is no right or wrong answer to this question, and the answer depends on the individual circumstances. But here are some of my thoughts that might aid in your decision making. With the start of a new year, you may be among the millions of people thinking of making an important change in your life.


"Thanks and farewell" emails

From time to time, I receive goodbye  emails, and in fact a recent email similar to the one below prompted me to write this blog entry.

Hello all,

After nearly 5 and a half years working for XYZ, it has been decided that my role will no longer be required beyond 2nd December 2011.
....
Thanks for the good times and ...............


In this scenario, it is fine if you had acquired marketable and sought-after skills to move on with your career, and not fine if your skills and knowledge were not kept up to date. Even if you find your work boring or not challenging, there is no excuse for not motivating yourself to acquire sought-after skills as there are plethora of online tutorials/articles and good books to keep your knowledge up to date. But, in a longer term, it is always better to acquire the much needed hands-on commercial experience. The skills to watch out for include technical skills, soft skills, domain knowledge, and personal traits.


Work at XYZ until you get a gold watch?

There are no more jobs like that – companies are under too much pressure to be lean and flexible (layoffs, downsizing, reorganization), so workers have to be, too (take on new challenges, acquire new skills). People jump the ship for a number of reasons like life style changes, feeling bored, burnt or stressed out, feeling stagnated, and wanting to earn more money. People steady the ship for a number of reasons like already jumped the ship too often, not ready to take on new challenges due to personal reasons, bad economy, etc. About 30 years ago, when my parents were in their working years, the prevailing notion was that an employer would "take care of you" for a long time with a secure job and a decent pension. But that's gone the way of the typewriter and carbon paper. Today, it's not uncommon to change jobs voluntarily every few years. Changing jobs (obviously, not too often) will

  • enhance your experience and broaden your knowledge and skills. To be successful, you need to have well rounded skills in technology and 16 key areas discussed.The longer you stay at one company, the less motivated you become to learn new technology/framework/tool, etc.
  • help you build up a wider network
  • make you progress in your career a lot quicker.
  • give you the confidence to find a job whenever you need to. Now a days, there is no real job security in being with a company for 10+ years unless you are going places within the organization and see yourself a good future there. The real security  comes from keeping your skills and knowledge up to date. Being complacent can come back and bite you.
  • increase your earning potential. If you are lucky enough to get a promotion with your current company, they will only give you a small increase in salary, just enough to justify the promotion and keep you. If you however require a decent promotion and increased package, changing jobs and employer is the way to go.  
  • You don't have to put up with things like "this is how we have always did it" syndrome. Getting different perspectives on development processes, agile practices, architectures, etc will give you an opportunity to  understand not only what works and what doesn't, but also when it does work without getting into the hype. Some businesses are not set up to embrace the latest and greatest. They are more business focused than technology focused. So, it real pays to work in different sectors like telecom, finance, insurance, software house, etc to "think outside the box" to see how the similar problems are solved differently in different sectors or organizations.
  • By expanding your horizons, you become a better coder and  problem solver.
In fact, stability is a big goal for new workers today because the old path of staying at the same job for stability does not necessarily work for everyone. Note: Some do progress well within the same organization. Here are a few tell tale signs to jump the ship when the time is right.

  • Your skills are not respected. If you feel that your employer doesn’t recognize your value to the company, then it may be time for a change. When you hand in your resignation, you are asked questions like -- what can I do to keep you here?
  • You’re stuck in the same position, doing the same things, for nearly the same pay, for a long time, it’s time to shake things up. Be realistic of the situation, rather than deluding yourselves into believing that things will miraculously improve or what your boss tell you to convince you to stay back.
  • Constantly looking at your watch and being unhappy at work.


Balance is the key

You need a balance between "changing ships too often" and "not changing ships at all". Some employers in selected industry segments will wonder "what's wrong" with an individual who has not changed jobs in X years, and on the other hand, there are still many employers who will look on frequent changes unfavorably. The obvious implications for them are, that you won't stay long enough to make any significant contributions, and that if you were hired, perhaps your tendency to leave quickly will inspire many otherwise loyal employees to leave as well.


How do you go about steadying the ship?

So, if you jump the ship too often, it is imperative that you find a way to communicate your frequent changes in the past as a positive, not a negative in your resume and at job interviews. For example,
  • Change in career direction.
  • Emphasizing that one of your primary objectives in this job change is to find an employer that will provide challenges and growth opportunities over the years.
  • Emphasizing that stability and permanence are at the top of your list of priorities, and that the targeted company appears to be one .
  • Providing references to your past employers who will vouch positively for your capabilities. This is why it is vital to always move on in good terms. Never burn bridges. Networking is a key aspect in your career progression.
  • Focusing more on your past accomplishments in your resume and at job interviews.

Conclusion

You are the captain of your ship, and best placed to solve your dilemma based on your current circumstance and career aspirations. It is not an easy decision to make. What ever your decision is, don't base it on monetary value alone.  Use a multi-attribute decision model like the one discussed in blog entry -- How to choose from multiple job offers? to cover all angles.

    "Love your job but don't love your company, because you may not know when your company stops loving you."

       -- by A. P. J. Abdul Kalam


    The books that motivate me:

    Labels:

    Spring Interview Questions and Answers: read properties file

    Spring Interview Questions and Answers Q1 - Q14 are FAQs

    Q1 - Q4 Overview & DIP Q5 - Q8 DI & IoC Q9 - Q10 Bean Scopes Q11 Packages Q12 Principle OCP Q14 AOP and interceptors
    Q15 - Q16 Hibernate & Transaction Manager Q17 - Q20 Hibernate & JNDI Q21 - Q22 read properties Q23 - Q24 JMS & JNDI Q25 JDBC Q26 Spring MVC Q27 - Spring MVC Resolvers

    Q21. How do you read properties file in spring?
    A21. PropertyPlaceholderConfigurer allows you to share a properties files. You can simply share one properties file for all of your build info or you can separate things out, and have multiple properties files in your build script.


    Managing properties for an enterprise application can be a bit trickier than one might expect. The following link covers some basics around working with properties files.

    Working with properties files


    STEP 1: Prepare the properties file to use. The myapp.properties file contains name/value pairs as shwon below.

    #statuses
    order.status.rejected=REJECTED
    order.status.filled=FILLED
    order.status.shipped=SHIPPED
    

    STEP 2: Define the interface and the implementation classes that read these properties.

    package test;
    
    public interface OrderNotification {
        abstract void processOrder();
    }


    The statuses are read from the above properties file.

    package test;
    
    import java.util.Map;
    
    public class OrderNotificationImpl implements OrderNotification {
    
     //read from properties file
     private Map<string,string> statuses;
    
     public OrderNotificationImpl(Map<string,string> statuses) {
       this.statuses = statuses;
     }
    
     @Override
     public void processOrder() {
     //....
       System.out.println(statuses.get("REJECTED"));
     }
    }
    

    STEP 3: The beans3.xml that read properties file and inject relevant values.


    <?xml version="1.0" encoding="UTF-8"?>
    <beans xmlns="http://www.springframework.org/schema/beans"
     xmlns:xsi="http://www.w3.org/2001/XMLSchema-instance" xmlns:tx="http://www.springframework.org/schema/tx"
     xmlns:aop="http://www.springframework.org/schema/aop" xmlns:context="http://www.springframework.org/schema/context"
     xmlns:jee="http://www.springframework.org/schema/jee"
     xsi:schemaLocation="
         http://www.springframework.org/schema/beans http://www.springframework.org/schema/beans/spring-beans-2.5.xsd
         http://www.springframework.org/schema/tx http://www.springframework.org/schema/tx/spring-tx-2.5.xsd
         http://www.springframework.org/schema/aop http://www.springframework.org/schema/aop/spring-aop-2.5.xsd
         http://www.springframework.org/schema/context http://www.springframework.org/schema/context/spring-context-2.5.xsd
         http://www.springframework.org/schema/jee http://www.springframework.org/schema/jee/spring-jee-2.5.xsd">
    
    
     <bean id="propertyPlaceholderConfigurer"
      class="org.springframework.beans.factory.config.PropertyPlaceholderConfigurer">
      <property name="locations">
       <list>
        <value>classpath:test/myapp.properties</value>
       </list>
      </property>
     </bean>
    
    
     <!-- inject properties -->
     <bean id="orderStatus" class="java.util.LinkedHashMap">
      <constructor-arg>
       <map key-type="java.lang.String" value-type="java.lang.String">
        <entry key="REJECTED">
         <value>${order.status.rejected}</value>
        </entry>
        <entry key="FILLED">
         <value>${order.status.filled}</value>
        </entry>
        <entry key="SHIPPED">
         <value>${order.status.shipped}</value>
        </entry>
       </map>
      </constructor-arg>
     </bean>
    
     <!-- Use the order status map-->
     <bean id="orderNotification" class="test.OrderNotificationImpl">
      <constructor-arg>
       <ref bean="orderStatus" />
      </constructor-arg>
     </bean>
    
    </beans>


    STEP 4: Finally, the standalone client application that makes use of the OrderNotification.

    package test;
    
    import org.springframework.beans.factory.BeanFactory;
    import org.springframework.context.support.ClassPathXmlApplicationContext;
    
    public class TestSpring3 {
        
        public static void main(String[] args) {
            ClassPathXmlApplicationContext appContext = new ClassPathXmlApplicationContext(
                    new String[] {"test/beans3.xml"});
            BeanFactory factory = (BeanFactory) appContext;
            OrderNotification orderNotification = (OrderNotification)factory.getBean("orderNotification");
            orderNotification.processOrder();
           
        }   
    }
    

    If you run the above stand-alone application, you get the following output

    30/11/2011 4:09:33 PM org.springframework.context.support.AbstractApplicationContext prepareRefresh
    INFO: Refreshing org.springframework.context.support.ClassPathXmlApplicationContext@86c347: startup date [Wed Nov 30 16:09:33 EST 2011]; root of context hierarchy
    30/11/2011 4:09:33 PM org.springframework.beans.factory.xml.XmlBeanDefinitionReader loadBeanDefinitions
    INFO: Loading XML bean definitions from class path resource [test/beans3.xml]
    30/11/2011 4:09:34 PM org.springframework.core.io.support.PropertiesLoaderSupport loadProperties
    INFO: Loading properties file from class path resource [test/myapp.properties]
    30/11/2011 4:09:34 PM org.springframework.beans.factory.support.DefaultListableBeanFactory preInstantiateSingletons
    INFO: Pre-instantiating singletons in org.springframework.beans.factory.support.DefaultListableBeanFactory@6c585a: defining beans [propertyPlaceholderConfigurer,orderStatus,orderNotification]; root of factory hierarchy
    REJECTED


    Q22. How would you go about reading environment specific property files?
    A22. The properties file can be loaded via a file system.

    STEP 1: Have the properties files in an external file system and not within the war or ear archives.

    STEP 2: The beans3.xml will have the following change -- change classpath: to file:

    <bean id="propertyPlaceholderConfigurer"
      class="org.springframework.beans.factory.config.PropertyPlaceholderConfigurer">
      <property name="locations">
       <list>
        <value>file:${PROPERTIES_HOME}/test/myapp_${ENV}.properties</value>
       </list>
      </property>
    </bean>


    STEP 3: Provide the JVM arguments PROPERTIES_HOME and ENV.

    java test.TestSpring3 -DPROPERTIES_HOME=C:\\opt2\\myapp   -DENV=dev 


    STEP 4: The rest remain the same as previous example.


    Q. How do you inject a java.util.Properties into your OrderNotification?
    A.

    STEP 1: Modify the OrderNotificationImpl as shown below. As you can se the, the java.utilProperties will be injected via setter injection.

    package test;
    
    import java.util.Map;
    import java.util.Properties;
    
    public class OrderNotificationImpl implements OrderNotification {
        
        private Map<string,string> statuses;
        private Properties appProperties;
        
        public OrderNotificationImpl(Map<string,string> statuses) {
           this.statuses = statuses;
        }
    
        @Override
        public void processOrder() {
            //....
            System.out.println(statuses.get("REJECTED"));
            System.out.println(appProperties.getProperty("order.status.shipped"));
        }
    
        public void setAppProperties(Properties appProperties) {
            this.appProperties = appProperties;
        }
    }


    STEP 2: Make some changes to the wiring. The beans4.xml uses the PropertiesFactoryBean and pass it to the PropertyPlaceholderConfigurer. Also, notice that the myappProperties is injected into orderNotification via setter injection.


    <?xml version="1.0" encoding="UTF-8"?>
    <beans xmlns="http://www.springframework.org/schema/beans"
     xmlns:xsi="http://www.w3.org/2001/XMLSchema-instance" xmlns:tx="http://www.springframework.org/schema/tx"
     xmlns:aop="http://www.springframework.org/schema/aop" xmlns:context="http://www.springframework.org/schema/context"
     xmlns:jee="http://www.springframework.org/schema/jee"
     xsi:schemaLocation="
         http://www.springframework.org/schema/beans http://www.springframework.org/schema/beans/spring-beans-2.5.xsd
         http://www.springframework.org/schema/tx http://www.springframework.org/schema/tx/spring-tx-2.5.xsd
         http://www.springframework.org/schema/aop http://www.springframework.org/schema/aop/spring-aop-2.5.xsd
         http://www.springframework.org/schema/context http://www.springframework.org/schema/context/spring-context-2.5.xsd
         http://www.springframework.org/schema/jee http://www.springframework.org/schema/jee/spring-jee-2.5.xsd">
    
    
     <bean id="myappProperties"
      class="org.springframework.beans.factory.config.PropertiesFactoryBean">
      <property name="singleton" value="true" />
    
      <property name="ignoreResourceNotFound" value="true" />
      <property name="locations">
       <list>
        <value>classpath:test/myapp.properties</value>
       </list>
      </property>
     </bean>
    
    
        <bean id="propertyPlaceholderConfigurer"
      class="org.springframework.beans.factory.config.PropertyPlaceholderConfigurer">
      <property name="properties" ref="myappProperties" /> 
     </bean>
    
     <!-- inject properties -->
     <bean id="orderStatus" class="java.util.LinkedHashMap">
      <constructor-arg>
       <map key-type="java.lang.String" value-type="java.lang.String">
        <entry key="REJECTED">
         <value>${order.status.rejected}</value>
        </entry>
        <entry key="FILLED">
         <value>${order.status.filled}</value>
        </entry>
        <entry key="SHIPPED">
         <value>${order.status.shipped}</value>
        </entry>
       </map>
      </constructor-arg>
     </bean>
    
     <!-- Use the order status map-->
     <bean id="orderNotification" class="test.OrderNotificationImpl">
      <constructor-arg>
       <ref bean="orderStatus" />
      </constructor-arg>
      <property name="appProperties" ref="myappProperties" />
     </bean>
    
    </beans>


    STEP 3: Finally, modify the TestSpring3 to use beans4.xml.

    package test;
    
    import org.springframework.beans.factory.BeanFactory;
    import org.springframework.context.support.ClassPathXmlApplicationContext;
    
    public class TestSpring3 {
        
        public static void main(String[] args) {
            ClassPathXmlApplicationContext appContext = new ClassPathXmlApplicationContext(
                    new String[] {"test/beans4.xml"});
            BeanFactory factory = (BeanFactory) appContext;
            OrderNotification orderNotification = (OrderNotification)factory.getBean("orderNotification");
            orderNotification.processOrder();     
        }   
    }
    

    The output will be:

    01/12/2011 11:15:55 AM org.springframework.context.support.AbstractApplicationContext prepareRefresh
    INFO: Refreshing org.springframework.context.support.ClassPathXmlApplicationContext@1f42b49: startup date [Thu Dec 01 11:15:55 EST 2011]; root of context hierarchy
    01/12/2011 11:15:55 AM org.springframework.beans.factory.xml.XmlBeanDefinitionReader loadBeanDefinitions
    INFO: Loading XML bean definitions from class path resource [test/beans4.xml]
    01/12/2011 11:15:56 AM org.springframework.core.io.support.PropertiesLoaderSupport loadProperties
    INFO: Loading properties file from class path resource [test/myapp.properties]
    01/12/2011 11:15:56 AM org.springframework.beans.factory.support.DefaultListableBeanFactory preInstantiateSingletons
    INFO: Pre-instantiating singletons in org.springframework.beans.factory.support.DefaultListableBeanFactory@12a55aa: defining beans [myappProperties,propertyPlaceholderConfigurer,orderStatus,orderNotification]; root of factory hierarchy
    REJECTED
    SHIPPED


    Q. How would you use annotations to inject properties?
    A. Spring 3.0 makes use of annotations, and the properties can be injected


    private @Value("${propertyName}") String propertyField;


    More Spring Interview Questions and Answers

    Labels:

    Java Interview Questions and Answers: working with proprties files

    Managing properties for an enterprise application can be a bit trickier than one might expect.


    Q: How would you go about managing properties files in your application?
    A: One great advantage of property files is that they let you change your application's configuration without recompilation. However, you most likely need to restart your application for the new configuration to take effect. However, you most likely need to restart your application for the new configuration to take effect. There are different types of properies files like

    1. Environment independent files archived within a war or ear. These can be loaded via the classpath.

    classpath:test/myapp.properties
    

    2. Environment independent files stored outside a war or ear. These need to be loaded via a file loader. Define a JVM argument or system property for the path of the file.
    file:${PROPERTIES_HOME}/test/myapp.properties
    

    3. Environment specific files stored outside a war or ear. These need to be loaded via a file loader. Define a JVM argument or system property for the path of the file.

    file:${PROPERTIES_HOME}/test/myapp_${my_env}.properties
    

    It is a best practice to store environment specific (e.g. test, dev, uat, staging, prod, etc)  files outside the war or ear archives as the same archive can be deployed to any environment without having to package environment specific archives.

    4. Properties file with sensitive information. Store the property values encrypted (Triple DES) or encoded (base64) with a salt. A salt is a secret that can be stored in a database or a separate file with proper access control.

    5. Dynamic information in properties file or loading a property file at runtime. For example, in your .properties file you can use
    #messages
    greeting=Welcome Mr. {0} {1} !!!
    

    Then use the MessageFormat class in Java

    MessageFormat.format((String) props.get("greeting"), firstName, lastName);
    

    You can also dynamically load .properties file with the load and store methods in java.util.Properties. It is recommended to use an existing configuration library like Apache Commons Configuration to load properties file at runtime without having to bring the server or application down. The commons config does support variable interpolation.

    application.title = ${application.name} ${application.version}
    

    Finally you can use JMX (Java Management eXtension) to write your own managed bean to change proprty values at runtime. A typical real life example would be to change log4j.xml debug levels. Appropriate log levels are very handy in diagnosing problems in production, but log levels like trace or debug can adversely impact performance. Hence, it is very useful to be able to set log levels at runtime.


    Here is a sample .properties file that can be used with Apache's commons configuration.

    #database - encrypted
    db.password=654fdgtr45#1232
    
    #database - clear
    db.host=localhost
    db.user=john
    
    #messages
    greeting=Welcome Mr. {0} {1} !!!
    
    #statuses
    order.status.rejected=REJECTED
    order.status.filled=FILLED
    order.status.shipped=SHIPPED
    
    
    # lists and arrays
    colors.pie = #FF0000, #00FF00, #0000FF
    
    #File includes -- include other .properties files
    include = email.properties


    Q. How would you load a properties file from a classpath or a file system?
    A. Here is a very basic code snippet.


    package test;
    
    import java.io.File;
    import java.io.FileInputStream;
    import java.io.IOException;
    import java.net.URL;
    import java.util.Properties;
    
    public class PropertiesUtil {
    
        public static Properties loadFromClassPath(String fileName) throws Exception {
            Properties props = new Properties();
            URL url = ClassLoader.getSystemResource(fileName);
            props.load(url.openStream());
            System.out.println(props);
            return props;
        }
        
        public static Properties loadFromFile(File propsFile) throws IOException {
            Properties props = new Properties();
            FileInputStream fis = new FileInputStream(propsFile);
            props.load(fis);    
            fis.close();
            System.out.println(props);
            return props;
        }
        
        public static void main(String[] args)  throws Exception {
            loadFromClassPath("test/myapp.properties");
            loadFromFile(new File("C:\\opt2\\myapp\\test\\myapp.properties"));
        }
    }


    Spring has the ability to load properties files as part of the application configuration, for use internally. The properties can be referenced within spring configuration files using ant-style placeholders, e.g. ${app.var}. Here is the link to step by step tutorial.

    Spring Interview Questions and Answers: read from properties file

    Labels:

    Nov 28, 2011

    Spring Interview Questions and Answers : Spring Bean life cycle, DI, and IOC

    Spring Interview Questions and Answers Q1 - Q14 are FAQs

    Q1 - Q4 Overview & DIP Q5 - Q8 DI & IoC Q9 - Q10 Bean Scopes Q11 Packages Q12 Principle OCP Q14 AOP and interceptors
    Q15 - Q16 Hibernate & Transaction Manager Q17 - Q20 Hibernate & JNDI Q21 - Q22 read properties Q23 - Q24 JMS & JNDI Q25 JDBC Q26 Spring MVC Q27 - Spring MVC Resolvers

    Q5. Can you describe the bean life cycle?
    A5. A Spring Bean represents a POJO (Plain Old Java Object) performing useful operation(s). All Spring Beans reside within a Spring IOC Container. The Spring Framework hides most of the complex infrastructure and the communication that happens between the Spring Container and the Spring Beans. The state-chart diagram below highlights these communications.


    Q6. What is a BeanFactory?
    A6. The BeanFactory is the actual container which instantiates, configures, and manages a number of beans. These beans typically collaborate with one another, and thus have dependencies between themselves.

    Q. How would you go about wiring up the spring managed bean dependencies?
    A. In general, the dependencies are wired via the Spring config file. For example, the MyBeanService depends on MyBeanDao, and MyBean depends on MyBeanService, etc via either constructor or setter injection.

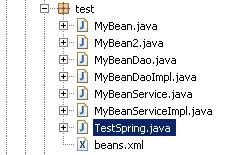
    Here is the big picture of the collaborating classes and interfaces.


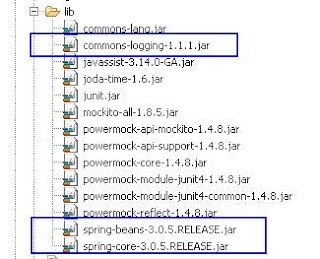
    Here are the libraries ( highlighted in blue rectangle) that needs to be in the classpath.The commons-logging is used by the spring-beans-xx.jar.


    STEP 1: Firstly define the relevant interfaces. Coding to interfaces is a good design parctice that loosely couples your classes.


    package test;
    
    public interface MyBeanDao {
       abstract void daoMethod();
    }
    

    package test;
    
    public interface MyBeanService {
        abstract void serviceMethod();
    }
    

    Now, define the concrete implementation for the above interfaces.

    package test;
    
    public class MyBeanDaoImpl implements MyBeanDao {
    
        @Override
        public void daoMethod() {
            System.out.println("dao method invoked ...");
        }
    }
    

    package test;
    
    public class MyBeanServiceImpl implements MyBeanService {
        
        private MyBeanDao beanDao;
    
        @Override
        public void serviceMethod() {
           System.out.println("Service method invoked...");
           beanDao.daoMethod();
        }
        
        public void setBeanDao(MyBeanDao beanDao) {
            System.out.println("setter injection .....");
            this.beanDao = beanDao;
        }  
    }


    Next, define the MyBean class that makes use of the MyBeanService and the

    package test;
    
    public class MyBean {
        
        private MyBeanService beanService;
        
        public MyBean(MyBeanService beanService) {
            System.out.println("Constructor injection...");
            this.beanService = beanService;
        }
        
        public void testMethod(){
            System.out.println("My bean method invoked ....");
            beanService.serviceMethod();
        }
    }
    

    STEP 2: Wire up the beans and the dependencies via an IOC container like Spring. The beans.xml file is shown below.

    <?xml version="1.0" encoding="UTF-8"?>
    <beans xmlns="http://www.springframework.org/schema/beans"
     xmlns:xsi="http://www.w3.org/2001/XMLSchema-instance" xmlns:tx="http://www.springframework.org/schema/tx"
     xmlns:aop="http://www.springframework.org/schema/aop" xmlns:context="http://www.springframework.org/schema/context"
     xmlns:jee="http://www.springframework.org/schema/jee" 
     xsi:schemaLocation="
         http://www.springframework.org/schema/beans http://www.springframework.org/schema/beans/spring-beans-2.5.xsd
         http://www.springframework.org/schema/tx http://www.springframework.org/schema/tx/spring-tx-2.5.xsd
         http://www.springframework.org/schema/aop http://www.springframework.org/schema/aop/spring-aop-2.5.xsd
         http://www.springframework.org/schema/context http://www.springframework.org/schema/context/spring-context-2.5.xsd
         http://www.springframework.org/schema/jee http://www.springframework.org/schema/jee/spring-jee-2.5.xsd">
    
     <bean id="myBeanDao" class="test.MyBeanDaoImpl"/>
     
     <bean id="myBeanService" class="test.MyBeanServiceImpl">
        <!-- setter injection of dao into service -->
        <property name="beanDao" ref="myBeanDao" />
     </bean>
     
     <bean id="myBean" class="test.MyBean"> 
        <!-- constructor injection of service into mybean -->
        <constructor-arg><ref bean="myBeanService" /></constructor-arg>
     </bean>
     
    </beans>
    

    As you can see, the MyBeanDao is injected via the setter injection into MyBeanService, and the MyBeanService is injected into MyBean via the constructor injection.


    Q. How do you bootstrap the initial bean?
    A.

    STEP 3: The TestSpring class is the client class that makes use of the MyBean. In order to access the initial entry point into your application, which in this case is "MyBean", it needs to be bootstrapped via a BeanFactory implementation class. It can be done a number of ways as demonstrated below.


    Using the "ClassPathXmlApplicationContext"

    package test;
    
    import org.springframework.beans.factory.BeanFactory;
    import org.springframework.context.support.ClassPathXmlApplicationContext;
    
    public class TestSpring {
        
        public static void main(String[] args) {
            ClassPathXmlApplicationContext appContext = new ClassPathXmlApplicationContext(
                    new String[] {"test/beans.xml"});
            BeanFactory factory = (BeanFactory) appContext;
            MyBean bean = (MyBean)factory.getBean("myBean"); 
            bean.testMethod();  
        }   
    }


    Using the "FileSystemResource"

    package test;
    
    import org.springframework.beans.factory.xml.XmlBeanFactory;
    import org.springframework.core.io.FileSystemResource;
    import org.springframework.core.io.Resource;
    
    public class TestSpring {
        
        public static void main(String[] args) {
            Resource res = new FileSystemResource("bin/test/beans.xml");
            XmlBeanFactory factory = new XmlBeanFactory(res);
            MyBean bean = (MyBean)factory.getBean("myBean"); 
            bean.testMethod();  
        }   
    }


    Using the "ClassPathResource"

    package test;
    
    import org.springframework.beans.factory.xml.XmlBeanFactory;
    import org.springframework.core.io.ClassPathResource;
    
    public class TestSpring {
        
        public static void main(String[] args) {
            ClassPathResource res = new ClassPathResource("test/beans.xml");
            XmlBeanFactory factory = new XmlBeanFactory(res);
            MyBean bean = (MyBean)factory.getBean("myBean"); 
            bean.testMethod();  
        }   
    }
    

    STEP 4: Run the TestSpring as a stand alone application, which prints the following.

    setter injection .....
    Constructor injection...
    My bean method invoked ....
    Service method invoked...
    dao method invoked ...
    

    When MyBean bean = (MyBean)factory.getBean("myBean"); is executed, the dependent beans are created and wired up by the IOC container. You can further extend this by providing the necessary hooks to further enhance your understanding.

    Q7. What would you do if it’s not practical (or impossible) to wire up your entire application into the Spring framework, but you still need a Spring loaded bean in order to perform a task?

    A7. For example,
    • an auto generated web service client class! But you do want to use the dependency injection feature of Spring to get some of the other beans injected in to this class.
    • A legacy code that needs to make use of a Spring bean.

    The ApplicationContextAware interface provided by Spring allows you to wire some java classes which are unable (or you don’t want it) to be wired to the Spring application context.


    STEP 1: The ApplicationContextAware interface makes sense when an object requires access to a set of collaborating beans.


    package test;
    
    import org.springframework.beans.BeansException;
    import org.springframework.context.ApplicationContext;
    import org.springframework.context.ApplicationContextAware;
    
    public class MyServiceFactory implements ApplicationContextAware {
        
        private ApplicationContext context;
    
        public void testMethod2(){
            System.out.println("Test method2 invoked ....");
        }
    
        @Override
        public void setApplicationContext(ApplicationContext ctx)
                throws BeansException {
           System.out.println("setting application context ..."); 
           this.context = ctx;
        }
        
        
        public MyBeanService getInstance(String accessCode) {
            //.....some logic
            MyBeanService beanService = (MyBeanService) context.getBean("myBeanService");
            return beanService;
        }
    }


    STEP 2: The beans2.xml file. The MyServiceFactory is not wired up.

    <?xml version="1.0" encoding="UTF-8"?>
    <beans xmlns="http://www.springframework.org/schema/beans"
     xmlns:xsi="http://www.w3.org/2001/XMLSchema-instance" xmlns:tx="http://www.springframework.org/schema/tx"
     xmlns:aop="http://www.springframework.org/schema/aop" xmlns:context="http://www.springframework.org/schema/context"
     xmlns:jee="http://www.springframework.org/schema/jee" 
     xsi:schemaLocation="
         http://www.springframework.org/schema/beans http://www.springframework.org/schema/beans/spring-beans-2.5.xsd
         http://www.springframework.org/schema/tx http://www.springframework.org/schema/tx/spring-tx-2.5.xsd
         http://www.springframework.org/schema/aop http://www.springframework.org/schema/aop/spring-aop-2.5.xsd
         http://www.springframework.org/schema/context http://www.springframework.org/schema/context/spring-context-2.5.xsd
         http://www.springframework.org/schema/jee http://www.springframework.org/schema/jee/spring-jee-2.5.xsd">
     
     
     <bean id="myBeanDao" class="test.MyBeanDaoImpl"/>
     
     <bean id="myBeanService" class="test.MyBeanServiceImpl">
        <!-- setter injection of dao into service -->
        <property name="beanDao" ref="myBeanDao" />
     </bean>
     
     <!-- No DI wiring -->
     <bean id="myServiceFactory" class="test.MyServiceFactory" /> 
       
    </beans>


    STEP 3: Finally, the client code that makes use of the MyServiceFactory class.

    package test;
    
    import org.springframework.beans.factory.BeanFactory;
    import org.springframework.context.support.ClassPathXmlApplicationContext;
    
    public class TestSpring2 {
        
        public static void main(String[] args) {
            ClassPathXmlApplicationContext appContext = new ClassPathXmlApplicationContext(
                    new String[] {"test/beans2.xml"});
            BeanFactory factory = (BeanFactory) appContext;
            MyServiceFactory servicefactory = (MyServiceFactory)factory.getBean("myServiceFactory"); 
            MyBeanService service = servicefactory.getInstance("111");
            service.serviceMethod();
        }   
    }

    The output will be:

    29/11/2011 3:59:29 PM org.springframework.context.support.AbstractApplicationContext prepareRefresh
    INFO: Refreshing org.springframework.context.support.ClassPathXmlApplicationContext@145e044: startup date [Tue Nov 29 15:59:29 EST 2011]; root of context hierarchy
    29/11/2011 3:59:29 PM org.springframework.beans.factory.xml.XmlBeanDefinitionReader loadBeanDefinitions
    INFO: Loading XML bean definitions from class path resource [test/beans2.xml]
    29/11/2011 3:59:29 PM org.springframework.beans.factory.support.DefaultListableBeanFactory preInstantiateSingletons
    INFO: Pre-instantiating singletons in org.springframework.beans.factory.support.DefaultListableBeanFactory@1a42792: defining beans [myBeanDao,myBeanService,myServiceFactory]; root of factory hierarchy
    setter injection .....
    setting application context ...
    Service method invoked...
    dao method invoked ...


    Q8. How would you create an application context from a web application?
    A8. As opposed to the BeanFactory, which will often be created programmatically, ApplicationContexts can be created declaratively using a ContextLoader. You can register an ApplicationContext using the ContextLoaderListener as shown below in the web.xml file. The Spring context listener provides more flexibility in terms of how an application is wired together. It uses the application's Spring configuration to determine what object to instantiate and loads the objects into the application context used by the servlet container.

    <web-app>
      .....
      <listener>
         <listener-class>org.springframework.web.context.ContextLoaderListener</listener-class>
      </listener>
      ....
    </web-app> 
    

    By default, it looks for a file named applicationContext.xml file in WEB-INF folder. But, you can configure the org.springframework.web.context.ContextLoaderListener class to use a context parameter called contextConfigLocation to determine the location of the Spring configuration file. The context parameter is configured using the context-parameter element. The context-param element has two children that specify parameters and their values. The param-name element specifies the parameter's name. The param-value element specifies the parameter's value.

    <web-app>
      ...
      <context-param>
        <param-name>contextConfigLocation</param-name>
        <param-value>WEB-INF/beans.xml</param-value>
      </context-param>
    
      <listener> 
        <listener-class>org.springframework.web.context.ContextLoaderListener</listener-class>
      </listener>
      ...
    </web-app>
    

    Note: There will be only one ServletContext for each web application. ServletContext will be created while deploying the application. Once the ServletContext is created, it will be used by all the servlets and jsp files in the same application. ServletContext is also called as the application scope variables in the web application scenario. The ContextLoaderListener is in the spring-web-xxx.jar. It is quite handy to check the Spring API for org.springframework.web.context.support.XmlWebApplicationContext class that describes this.

    For a WebApplicationContext that reads in a different bean definition format, you could define your own implementation, and define your implementation with the "contextClass" init parameter.

    Here is another example with multiple Spring files.

    <webapp>
       ..
       <context-param>
      <param-name>contextClass</param-name>
      <param-value>com.myapp.MyappXmlWebApplicationContext</param-value>
     </context-param>
    
       <context-param>
      <param-name>contextConfigLocation</param-name>
      <param-value>
       classpath*:/com/myapp/transactionContext.xml
       classpath*:/com/myapp/daoContext.xml  
       classpath*:/com/myapp/override-daoContext${my.env}.xml
                /WEB-INF/webservice-interceptor-config.xml
       /WEB-INF/webservice-config.xml
       classpath*:/cxf.xml
      </param-value>
     </context-param>   
     
       <listener> 
           <listener-class>org.springframework.web.context.ContextLoaderListener</listener-class>
       </listener>
       
    </web-app>


    The contextClass can be defined something like.

    package com.myapp;
    
    import java.io.IOException;
    import java.util.ArrayList;
    import java.util.Collection;
    
    import org.springframework.core.io.Resource;
    import org.springframework.core.io.ResourceLoader;
    import org.springframework.core.io.support.ResourcePatternResolver;
    import org.springframework.web.context.support.ServletContextResourcePatternResolver;
    import org.springframework.web.context.support.XmlWebApplicationContext;
    
    public class MyappXmlWebApplicationContext extends XmlWebApplicationContext {
        private static final String MY_ENV = "my.env";
        private static final String MY_ENV_PLACEHOLDER = "\\$\\{" + MY_ENV + "\\}";
    
        protected ResourcePatternResolver getResourcePatternResolver() {
            return new PatchedResourcePatternResolver(this);
        }
    
        private static class PatchedResourcePatternResolver extends ServletContextResourcePatternResolver {
    
            public PatchedResourcePatternResolver(ResourceLoader resourceLoader) {
                super(resourceLoader);
            }
    
            public Resource[] getResources(String locationPattern) throws IOException {
                locationPattern = locationPattern.replaceAll(MY_ENV_PLACEHOLDER, System.getProperty(MY_ENV, ""));
                Resource[] resources = super.getResources(locationPattern);
    
                if (0 < locationPattern.substring(CLASSPATH_ALL_URL_PREFIX.length()).length()) {
                    return resources;
                }
    
                Collection<Resource> filteredResources = new ArrayList<Resource>();
                for (int i = 0; i < resources.length; i++) {
                    Resource resource = resources[i];
                    if (!resource.getURL().getProtocol().equals("jar")) {
                        filteredResources.add(resource);
                    }
                }
                return (Resource[]) filteredResources.toArray(new Resource[filteredResources.size()]);
            }
        }
    }


    More Spring Interview Questions and Answers

    Labels:

    Nov 21, 2011

    Java Interview Q&A on SSL and truststore vs keystore?

    Q. What do you understand by the terms trusstores and keystores in Java?

    A. You generally need a truststore that points to a file containing trusted certificates, no matter whether you are implementing the server or the client side. You may or may not need a keystore. The keystore points to a file containing private key. You need a keystore if

    • you are implementing the server side of the protocol, or 
    • you are implementing the client side and you need to authenticate yourself to the server. 
    The keystore will be used for encrypting/signing some thing with your private key while the trust stores will be used mostly to authenticate remote servers. To create a trust store, follow the steps outlined below.

    STEP 1:

    The first step is to get hold of the certificates. You could export the certificates from Google chrome or Firefox. If you click the "view site" information in Google Chrome, it's possible to save to file any cert in the chain. In Firefox, you could try something like


    Click on "I understand the Risks" and then on "Add exception". You will be getting a screen as shown below.


    Click on "Get certificate" and then "View". On the 2nd tab, named "details" you will see an export button to export the certificate.


    Save the file as shown above to be imported into your truststore as explained below.

    STEP 2:

    To create a working truststore, it needs to contain the certs to trust, as well as the certs in the parent chain. You can import certificates with the keytool that ships with Java.

    Import parent certificate

    keytool -importcert -alias myservices -file mydomain.crt -keystore truststore.jks
    

    import another linked certificate

    keytool -importcert -alias coreservices -file mydomain2.crt -keystore truststore.jks
    

    Note: When prompted enter a password and answer yes to trust this certificate.


    to view the certificates

    keytool -list -keystore truststore.jks


    STEP 3:

    Use the trust store as shown below.

    java -Djavax.net.ssl.trustStore=C:\whatever\truststore.jks  -Djavax.net.ssl.trustStorePassword=changeit 


    Q. How do you go about resolving any SSL related installation issues?
    A. There are several SSL tools that are available that can help you determine SSL problems and get your servers running SSL properly.

    OpenSSL is an open source implementation of the SSL protocol, and by far the most versatile SSL tool.


    Q. What is a one-way SSL?
    A. One way SSL just means that the server does not validate the identity of the client. The client generates a random key, encrypts it so that only the server can decrypt it, and sends it to the server. The server and client now have a shared secret that can be used to encrypt and validate the communications in both directions.

    Labels: ,